
Tích Hợp Thanh Toán Với Stripe Cartalyst Trên Laravel Chuyên mục PHP và Laravel 2024-03-26 26 Lượt xem 23 Lượt thích 0 Bình luận

Chào mừng bạn đến với hướng dẫn sử dụng Stripe Cartalyst để tích hợp một hệ thống thanh toán mạnh mẽ vào ứng dụng Laravel của bạn. Stripe là một trong những cổng thanh toán hàng đầu trên thế giới, cung cấp một loạt các công cụ linh hoạt cho việc xử lý thanh toán trực tuyến dễ dàng và an toàn.
Cartalyst là một bộ công cụ mạnh mẽ cho Laravel, cung cấp các gói mở rộng cho nhiều chức năng khác nhau, bao gồm cả tích hợp thanh toán. Sử dụng gói Cartalyst Stripe, bạn có thể tích hợp thanh toán của Stripe vào ứng dụng Laravel của mình một cách nhanh chóng và hiệu quả.
Trong hướng dẫn này, chúng ta sẽ đi qua quá trình cài đặt và cấu hình Cartalyst Stripe trong Laravel, từ việc cài đặt package cho đến việc tích hợp nó vào các route và giao diện người dùng của bạn. Mình sẽ hướng dẫn bạn cách tạo các sản phẩm, giỏ hàng và quản lý thanh toán sử dụng Stripe trong ứng dụng Laravel của bạn.
Dù bạn đang xây dựng một cửa hàng trực tuyến, một trang web dịch vụ hoặc bất kỳ ứng dụng nào đòi hỏi tính năng thanh toán, việc tích hợp Stripe Cartalyst vào Laravel sẽ giúp bạn tiết kiệm thời gian và công sức, đồng thời đảm bảo tính bảo mật và tin cậy cho hệ thống thanh toán của bạn.
Hãy bắt đầu và khám phá cách tích hợp một cách dễ dàng và linh hoạt nhất với Stripe Cartalyst và Laravel!
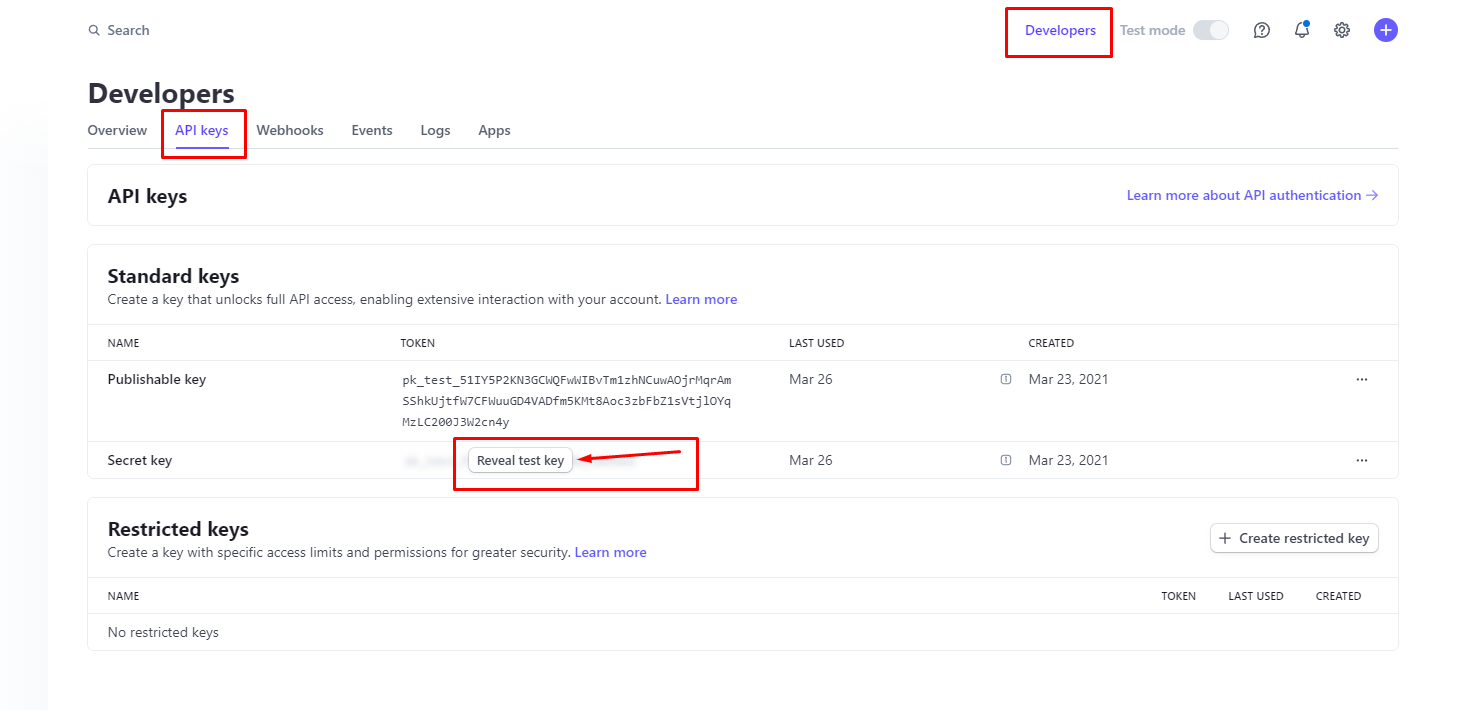
Đầu tiền các ban hãy đăng nhập vào Dashboard quản lý của Stripe và sau đó chuyển sang chế độ developer để chúng ta thực thi trên môi trường kiểm thử trước, Và tiếp theo đó các bạn cần lấy mã SECRET KEY của Stripe để tích hợp vào ứng dụng.
Sau đó chúng ta chuyển sang bước tích hợp với ứng dụng của chúng ta:
Bước 1: Cài Đặt Gói Cartalyst Stripe
Đầu tiên, chúng ta cần cài đặt gói Cartalyst Stripe thông qua Composer bằng cách chạy lệnh sau trong terminal:
composer require cartalyst/stripe-laravel:"^15.0"Thiết lập Service Provider and Facade alias:
Sau khi cài đặt package, hãy mở tệp cấu hình Laravel của bạn tại config/app.php và thêm các dòng sau.
Trong mảng $providers thêm nhà cung cấp dịch vụ sau cho gói này.
Cartalyst\Stripe\Laravel\StripeServiceProvider::class,Trong mảng $aliases thêm giao diện sau cho gói này.
'Stripe' => Cartalyst\Stripe\Laravel\Facades\Stripe::class,Bước 2: Cấu Hình
Sau khi cài đặt, bạn cần cấu hình gói Cartalyst Stripe bằng cách thêm thông tin tài khoản Stripe của bạn vào file cấu hình của Laravel. Mở file config/service.php và cấu hình như sau:
'stripe' => [
'secret' => env('STRIPE_SECRET'),
],Và đảm bảo bạn đã đặt các giá trị STRIPE_SECRET trong file .env:
STRIPE_SECRET=your_stripe_secretBước 3: Cơ sở dữ liệu
Dưới đây là các bảng cơ sở dữ liệu sample mà mình chuẩn bị cho các bạn.
Bảng products:
Schema::create('products', function (Blueprint $table) {
    $table->id();
    $table->string('title');
    $table->string('description')->nullable();
    $table->string('image');
    $table->decimal('price');
    $table->timestamps();
});
Bẳng Orders:
Schema::create('orders', function (Blueprint $table) {
    $table->id();
    $table->string('first_name');
    $table->string('last_name');
    $table->string('email');
    $table->timestamps();
    $table->string('code');
    $table->unsignedBigInteger('user_id');
    $table->string('address');
    $table->string('address2');
    $table->string('customer_email');
    $table->string('city');
    $table->string('country');
    $table->string('zip');
    $table->tinyInteger('complete')->default(0);
    $table->string('transaction_id')->nullable();
});
Bảng order_items:
public function up(): void
{
    Schema::create('order_items', function (Blueprint $table) {
        $table->id();
        $table->unsignedBigInteger('order_id');
        $table->string('product_title');
        $table->decimal('price');
        $table->unsignedInteger('quantity');
        $table->decimal('customer_revenue');
        $table->decimal('admin_revenue');

        $table->foreign('order_id')->references('id')->on('orders');

        $table->timestamps();
    });
}
Bước 4: Tích Hợp Thanh Toán
Tích hợp thanh toán vào ứng dụng của bạn bằng cách tạo route để xử lý thanh toán. Bạn có thể sử dụng các phương thức như stripe() để tạo phiên thanh toán và trả về một URL thanh toán cho người dùng. Dưới đây là cách mà bạn thực hiện điều đó.
Route::group([
    'prefix' => 'checkout'
], function() {
    Route::post('/orders', [OrderController::class, 'store']);
});
<?php
namespace App\Http\Controllers\Api\Checkout;
use App\Http\Controllers\Controller;
use Illuminate\Http\Request;
use App\Http\Controllers\Api\DefaultController;
use App\Http\Resources\Order\OrderResource;
use App\Models\Link;
use App\Models\Order;
use App\Models\OrderItem;
use App\Models\Product;
use Cartalyst\Stripe\Laravel\Facades\Stripe;
use Illuminate\Support\Facades\DB;
class OrderController extends DefaultController
{
public function store(Request $request)
{
$link = Link::where('code', $request->code)->first();
$params = $request->all();
$params['code'] = $link->code;
$params['user_id'] = $link->user->id;
$params['customer_email'] = $link->user->email;
DB::beginTransaction();
$order = Order::create($params);
$lineItems = [];
foreach ($request->items as $item) {
$product = Product::where('id', $item['product_id'])->first();
if($product) {
$orderItem = new OrderItem();
$orderItem->order_id = $order->id;
$orderItem->product_title = $product->title;
$orderItem->price = $product->price;
$orderItem->quantity = $item['quantity'];
$orderItem->customer_revenue = 0.1 * $product->price * $item['quantity'];
$orderItem->admin_revenue = 0.9 * $product->price * $item['quantity'];
$orderItem->save();
}
$lineItems[] = [
'name' => $product->title,
'description' => $product->description,
'images' => [
$product->image
],
'amount' => 100 * $product->price,
'currency' => 'usd',
'quantity' => $orderItem->quantity
];
}
$stripe = Stripe::make(env('STRIPE_SECRET_ACCESS_KEY'));
$source = $stripe->checkout()->sessions()->create([
'payment_method_types' => ['card'],
'line_items' => $lineItems,
'success_url' => "env('FRONT_END_URL')/success?source={CHECKOUT_SESSION_ID}",
'cancel_url' => "env('FRONT_END_URL')/error"
]);
// Lưu trữ source id được trả về từ stripe
$order->transaction_id = $source['id'];
$order->save();
DB::commit();
return $this->responseSuccess(
$source,
__('common.success_message')
);
}
}
Sau bạn dùng postman test thử thì sẽ nhận được các thông tin như sau sau:
{
    "message": "The operation was successful.",
    "data": {
        "id": "cs_test_b1GMV0JhKg8k3hgryF9AqC7DQZe9RK7NPQfvPg82rg1wdJT2qs88tVBbOK",
        "object": "checkout.session",
        "after_expiration": null,
        "allow_promotion_codes": null,
        "amount_subtotal": 102000,
        "amount_total": 102000,
        "automatic_tax": {
            "enabled": false,
            "liability": null,
            "status": null
        },
        "billing_address_collection": null,
        "cancel_url": "http://localhost:8080/error",
        "client_reference_id": null,
        "client_secret": null,
        "consent": null,
        "consent_collection": null,
        "created": 1711435219,
        "currency": "usd",
        "currency_conversion": null,
        "custom_fields": [],
        "custom_text": {
            "after_submit": null,
            "shipping_address": null,
            "submit": null,
            "terms_of_service_acceptance": null
        },
        "customer": null,
        "customer_creation": "always",
        "customer_details": null,
        "customer_email": null,
        "display_items": [
            {
                "amount": 8000,
                "currency": "usd",
                "custom": {
                    "description": "Libero et recusandae dignissimos pariatur dolores aut. Quis est autem consequatur libero aut. Consequatur quos animi veritatis reprehenderit.",
                    "images": [
                        "https://via.placeholder.com/640x480.png/00aa77?text=est"
                    ],
                    "name": "Mr."
                },
                "quantity": 1,
                "type": "custom"
            },
            {
                "amount": 9400,
                "currency": "usd",
                "custom": {
                    "description": "Cumque libero voluptatem sit qui odio. Officiis voluptatibus excepturi totam repellendus hic ut dignissimos. Necessitatibus in voluptatibus qui non dolores.",
                    "images": [
                        "https://via.placeholder.com/640x480.png/009977?text=omnis"
                    ],
                    "name": "Dr."
                },
                "quantity": 10,
                "type": "custom"
            }
        ],
        "expires_at": 1711521619,
        "invoice": null,
        "invoice_creation": {
            "enabled": false,
            "invoice_data": {
                "account_tax_ids": null,
                "custom_fields": null,
                "description": null,
                "footer": null,
                "issuer": null,
                "metadata": [],
                "rendering_options": null
            }
        },
        "livemode": false,
        "locale": null,
        "metadata": [],
        "mode": "payment",
        "payment_intent": "pi_3OyTgFKN3GCWQFwW1sQHsdL9",
        "payment_link": null,
        "payment_method_collection": "always",
        "payment_method_configuration_details": null,
        "payment_method_options": {
            "card": {
                "request_three_d_secure": "automatic"
            }
        },
        "payment_method_types": [
            "card"
        ],
        "payment_status": "unpaid",
        "phone_number_collection": {
            "enabled": false
        },
        "recovered_from": null,
        "setup_intent": null,
        "shipping": null,
        "shipping_address_collection": null,
        "shipping_options": [],
        "shipping_rate": null,
        "status": "open",
        "submit_type": null,
        "subscription": null,
        "success_url": "http://localhost:8080/success?source={CHECKOUT_SESSION_ID}",
        "total_details": {
            "amount_discount": 0,
            "amount_shipping": 0,
            "amount_tax": 0
        },
        "ui_mode": "hosted",
        "url": "https://checkout.stripe.com/c/pay/cs_test_b1GMV0JhKg8k3hgryF9AqC7DQZe9RK7NPQfvPg82rg1wdJT2qs88tVBbOK#fidkdWxOYHwnPyd1blpxYHZxWjA0TFwwVTdOSzZCRlJUQ3JSTEdzUWg0f21LRnByREpvd0h0d0RoVlZtblBvcWNSMkZDUnBwQkExU0RBY2gwTkhxPURqZjZ%2FZ0NnXzR2U3FvaUpcdEh%2FSUY3NTVPNlI3ZmsxfCcpJ2N3amhWYHdzYHcnP3F3cGApJ2lkfGpwcVF8dWAnPydocGlxbFpscWBoJyknYGtkZ2lgVWlkZmBtamlhYHd2Jz9xd3BgeCUl"
    },
    "status": 200
}
Sau đó hãy copy url mà Stripe trả về cho chúng ta lên browser:
{
"message": "The operation was successful.",
"data": {
...
"ui_mode": "hosted",
"url": "https://checkout.stripe.com/c/pay/cs_test_b1GMV0JhKg8k3hgryF9AqC7DQZe9RK7NPQfvPg82rg1wdJT2qs88tVBbOK#fidkdWxOYHwnPyd1blpxYHZxWjA0TFwwVTdOSzZCRlJUQ3JSTEdzUWg0f21LRnByREpvd0h0d0RoVlZtblBvcWNSMkZDUnBwQkExU0RBY2gwTkhxPURqZjZ%2FZ0NnXzR2U3FvaUpcdEh%2FSUY3NTVPNlI3ZmsxfCcpJ2N3amhWYHdzYHcnP3F3cGApJ2lkfGpwcVF8dWAnPydocGlxbFpscWBoJyknYGtkZ2lgVWlkZmBtamlhYHd2Jz9xd3BgeCUl"
},
"status": 200
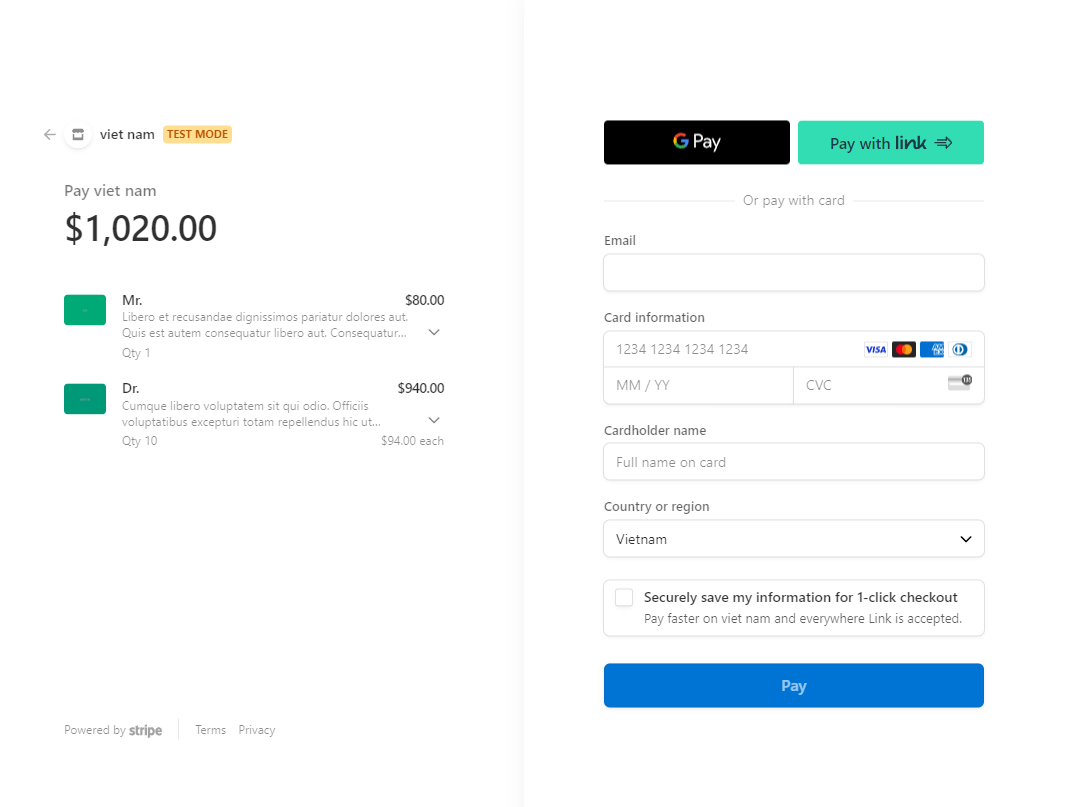
}Chúng ta sẽ được redirect đến trang checkout của Stripe hình bên dưới, mình đang viết dưới dạng API để trả về JSON cho FE chính vì vậy bên FE sẽ xử lý và điều hướng đến URL trên.
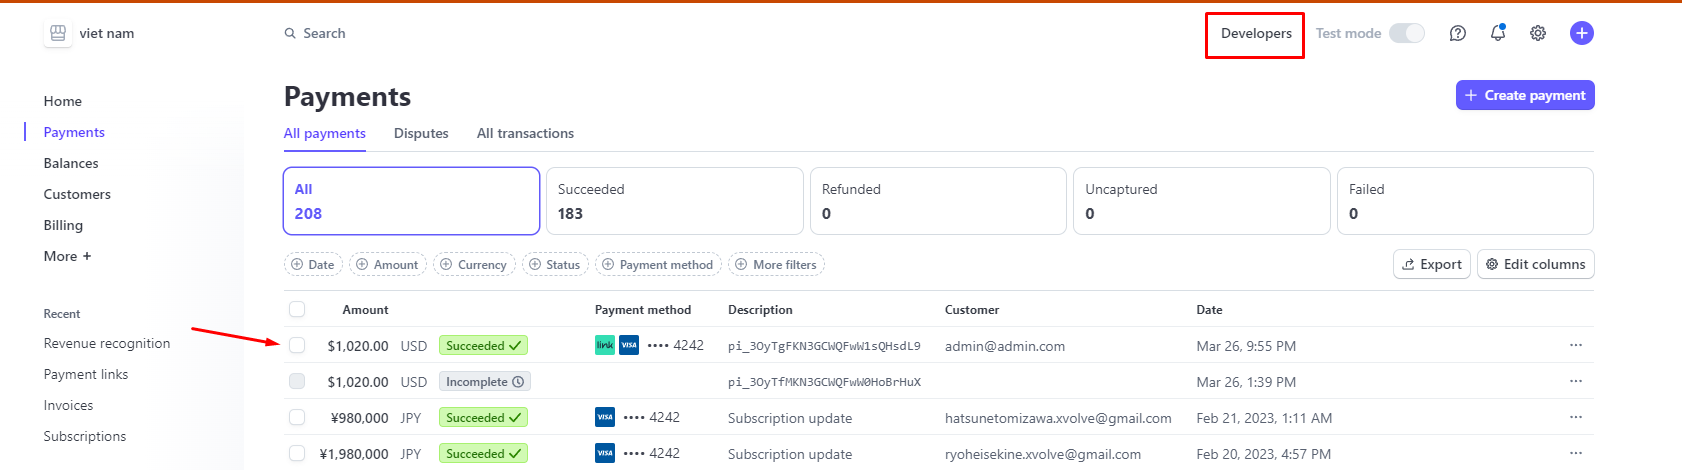
Sau khi nhập thông tin tài khoản thẻ và PAY thành công thì Stripe sẽ điều hướng chúng ta về URL success và kèm theo cái source id mà chúng ta đã khai báo trước đó với Stripe, Khi vào màn quản lý trên Dashboad của Stripe các bạn sẽ thấy dữ liệu của khách hàng đã được lưu trữ.
Bước 5: Xử Lý Kết Quả Thanh Toán
Cuối cùng, xử lý kết quả thanh toán trong ứng dụng của bạn bằng cách tạo các route tương ứng để xử lý kết quả thanh toán thành công hoặc thất bại.
Thành Công:
//Checkout
Route::group([
    'prefix' => 'checkout'
], function() {
    Route::post('/orders', [CheckoutOrderController::class, 'store']);
    Route::post('/orders/payment/success', [CheckoutOrderController::class, 'success']);
});
public function success(Request $request) {
$order = Order::where('transaction_id', $request->transaction_id)->first();
if(!$order) return $this->responseBadRequest();
$order->complete = 1;
$order->save();
return $this->responseSuccess(
[],
__('common.success_message')
);
}Thất bại:
Route::get('/payment/cancel', function () {
return 'Payment canceled!';
});Kết Luận
Đây là các bước cơ bản để tích hợp Stripe Cartalyst vào ứng dụng Laravel của bạn. Hãy tận dụng các tính năng mạnh mẽ của Stripe để xây dựng một hệ thống thanh toán linh hoạt và an toàn cho ứng dụng của bạn.


Bình luận (0)