
Continuous Integration sử dụng Github, Jenkins, Nexus, Sonarqube, ECR, ECS, Slack - P1 Chuyên mục Devops 2025-02-04 9 Lượt xem 8 Lượt thích 0 Bình luận
Việc áp dụng Tích hợp liên tục (Continuous Integration - CI) đã trở thành yếu tố quan trọng để đảm bảo quy trình phân phối phần mềm chất lượng cao một cách hiệu quả. CI là một phương pháp phát triển phần mềm, trong đó các thay đổi mã nguồn được tự động tích hợp vào kho lưu trữ chung nhiều lần trong ngày. Phương pháp này nhằm phát hiện và khắc phục sớm các vấn đề tích hợp trong quá trình phát triển, qua đó cải thiện sự hợp tác, giảm thiểu lỗi thủ công và tăng tốc quy trình phân phối phần mềm.
Các công cụ hỗ trợ Tích hợp liên tục (CI)
Để thực hiện Tích hợp liên tục (CI) một cách hiệu quả, nhiều công cụ đóng vai trò quan trọng trong việc tự động hóa các khía cạnh khác nhau của vòng đời phát triển phần mềm. Trong bối cảnh này, các công cụ Jenkins, Nexus, SonarQube và Slack trở thành những thành phần thiết yếu trong hệ sinh thái CI hoàn chỉnh.
-
Jenkins: Jenkins là một máy chủ tự động hóa mã nguồn mở giúp điều phối toàn bộ quy trình CI/CD. Nó cho phép các nhà phát triển tự động hóa việc build (biên dịch), kiểm thử và triển khai ứng dụng, tạo nền tảng vững chắc cho CI. Jenkins hỗ trợ nhiều plugin, giúp nó có thể mở rộng và thích ứng với nhiều môi trường phát triển khác nhau.
-
Nexus: Nexus (cụ thể là Nexus Repository Manager) là một trình quản lý kho lưu trữ, đóng vai trò quan trọng trong việc quản lý và lưu trữ các tệp nhị phân, thư viện, dependencies (phụ thuộc) và kết quả build. Nó giúp đảm bảo rằng các artifact cần thiết trong quá trình phát triển luôn sẵn sàng, giúp duy trì tính nhất quán và độ tin cậy trong các giai đoạn phát triển và triển khai phần mềm.
-
SonarQube: SonarQube là một công cụ phân tích mã nguồn tĩnh, tập trung vào chất lượng và bảo mật mã nguồn. Nó giúp xác định và xử lý các vấn đề liên quan đến code smell, lỗi (bugs) và lỗ hổng bảo mật (vulnerabilities), cho phép lập trình viên duy trì tiêu chuẩn mã hóa cao và nâng cao độ tin cậy của mã nguồn. Việc tích hợp SonarQube vào pipeline CI đảm bảo rằng chất lượng mã nguồn được theo dõi và cải thiện liên tục.
-
Slack: Slack là một nền tảng hỗ trợ giao tiếp và cộng tác trong nhóm phát triển phần mềm. Việc tích hợp Slack vào pipeline CI giúp gửi thông báo và cảnh báo theo thời gian thực, giúp các thành viên trong nhóm luôn cập nhật tình trạng build, kiểm thử và chất lượng mã nguồn. Điều này giúp tăng khả năng giám sát và tạo ra một môi trường làm việc cộng tác, nơi các vấn đề có thể được xử lý nhanh chóng ngay khi chúng phát sinh.
Sự kết hợp giữa Jenkins, Nexus, SonarQube và Slack tạo nên một hệ sinh thái CI mạnh mẽ và có tính cộng hưởng cao. Những công cụ này tự động hóa và tối ưu hóa quy trình phát triển phần mềm, đảm bảo rằng phần mềm được phân phối nhanh chóng, chất lượng cao và hiệu quả. Cách tiếp cận tích hợp này không chỉ giúp tăng tốc vòng đời phát triển mà còn góp phần tạo ra các hệ thống phần mềm mạnh mẽ và đáng tin cậy.
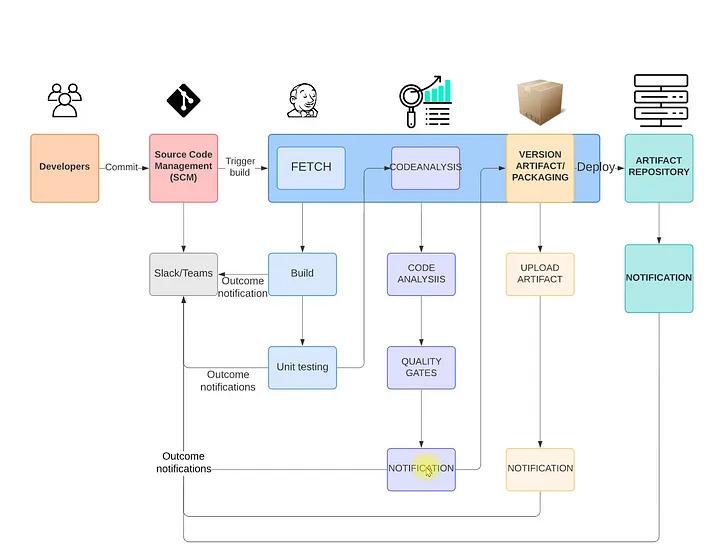
Quy trình triển khai
- Đăng nhập vào tài khoản AWS
- Tạo Key Pair (cặp khóa bảo mật)
- Tạo Security Group (nhóm bảo mật) cho tất cả các server (Jenkins, Nexus và SonarQube)
- Tạo EC2 Instances với UserData scripts cho Jenkins, Nexus và SonarQube
- Cấu hình sau cài đặt, bao gồm:
- Cài đặt Jenkins và thiết lập plugin
- Cài đặt Nexus và cấu hình repository
- Đăng nhập và kiểm thử SonarQube
- Git:
- Tạo GitHub Repository và migrate mã nguồn
- Tích hợp GitHub với VS Code và kiểm thử
- Build Job với Nexus Repository
- Cấu hình GitHub WebHook
- Tích hợp SonarQube vào pipeline
- Upload artifact lên Nexus Repository
- Gửi thông báo qua Slack
Quy trình trên đảm bảo việc triển khai CI/CD diễn ra một cách tự động, hiệu quả và bảo mật, giúp tăng tốc độ phát triển phần mềm và nâng cao chất lượng sản phẩm
Trong quy trình làm việc của chúng ta, trước tiên, chúng ta đăng nhập vào AWS Management Console và điều hướng đến bảng điều khiển EC2. Tại đây, chúng ta truy cập vào phần Key Pair để tạo một cặp khóa bảo mật. Cặp khóa này đóng vai trò quan trọng trong việc tạo máy chủ và thiết lập kết nối SSH an toàn. Bằng cách tuân theo quy trình tối ưu này, chúng ta đảm bảo quá trình cung cấp máy chủ diễn ra an toàn, phù hợp với các phương pháp hay nhất (best practices) của DevOps trên nền tảng đám mây.
Tại đây, chúng ta đặt tên cho Key Pair, chọn loại Key Pair, và tiến hành tạo cặp khóa bảo mật.

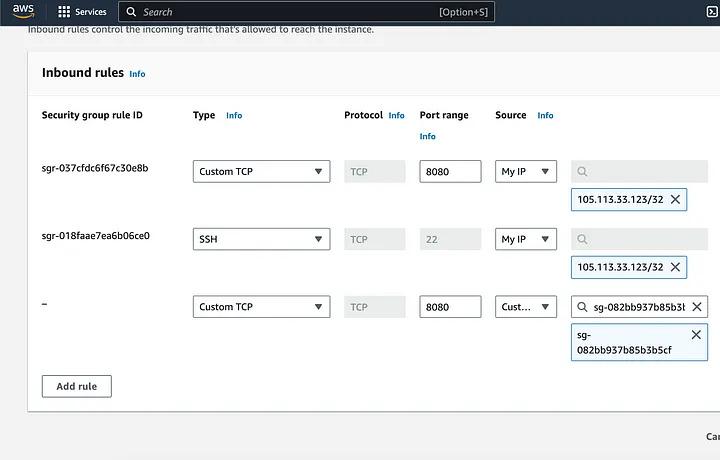
Tiếp theo, chúng ta sẽ tạo Security Groups cho các máy chủ. Điều hướng đến phần Security Groups và tạo các nhóm bảo mật riêng biệt cho các máy chủ Jenkins, Nexus và SonarQube. Đảm bảo mở các cổng cần thiết để các máy chủ có thể giao tiếp với nhau.
Trong cài đặt Security Group cho Jenkins, cần mở các cổng sau:
- Cổng 22: Dùng cho kết nối SSH.
- Cổng 8080: Đây là cổng mặc định của Jenkins.


Đối với Security Group của Nexus, cần mở các cổng sau:
- Cổng 22: Dùng cho kết nối SSH.
- Cổng 8081: Đây là cổng mặc định của Nexus.
Ngoài ra, để tăng cường bảo mật, hãy chỉ cho phép truy cập từ các địa chỉ IP cụ thể. Cụ thể:
- Chỉ cho phép IP của bạn truy cập vào cổng 8081.
- Cho phép Security Group của Jenkins truy cập vào cổng 8081 trên Nexus.
Cấu hình này giúp Jenkins có thể upload artifacts lên Nexus, đồng thời cho phép việc tải xuống dependencies từ Nexus một cách an toàn. Đây là một best practice quan trọng để đảm bảo môi trường hạ tầng của bạn được kiểm soát và bảo mật. 🔒


Đối với Security Group của SonarQube, cần mở các cổng sau:
- Cổng 22: Dùng cho kết nối SSH.
- Cổng 9000: Đây là cổng mặc định của SonarQube.
- Cổng 80: Nexus service trên máy chủ SonarQube sẽ lắng nghe trên cổng này.
Ngoài ra, để đảm bảo tích hợp giữa các dịch vụ, cần cấp quyền truy cập cho Security Group của Jenkins. Điều này rất quan trọng vì Jenkins cần gửi kết quả kiểm thử lên SonarQube.
Cấu hình này giúp SonarQube và Jenkins có thể giao tiếp một cách trơn tru, tối ưu quy trình DevOps và đảm bảo hiệu suất cao trong pipeline CI/CD. 🚀


Trong Security Group của Jenkins, cần cấp quyền truy cập cho Security Group của SonarQube để SonarQube có thể gửi báo cáo kiểm thử trở lại Jenkins.
Để thực hiện điều này:
- Tạo Security Group cho SonarQube trước.
- Chỉnh sửa Inbound Rules của Security Group Jenkins, cho phép truy cập từ Security Group SonarQube.
Cách tiếp cận có mục tiêu này giúp tăng cường bảo mật, đảm bảo rằng chỉ các dịch vụ cần thiết mới có thể giao tiếp với nhau trong dự án, kiểm soát và giới hạn quyền truy cập một cách hợp lý. 🔒
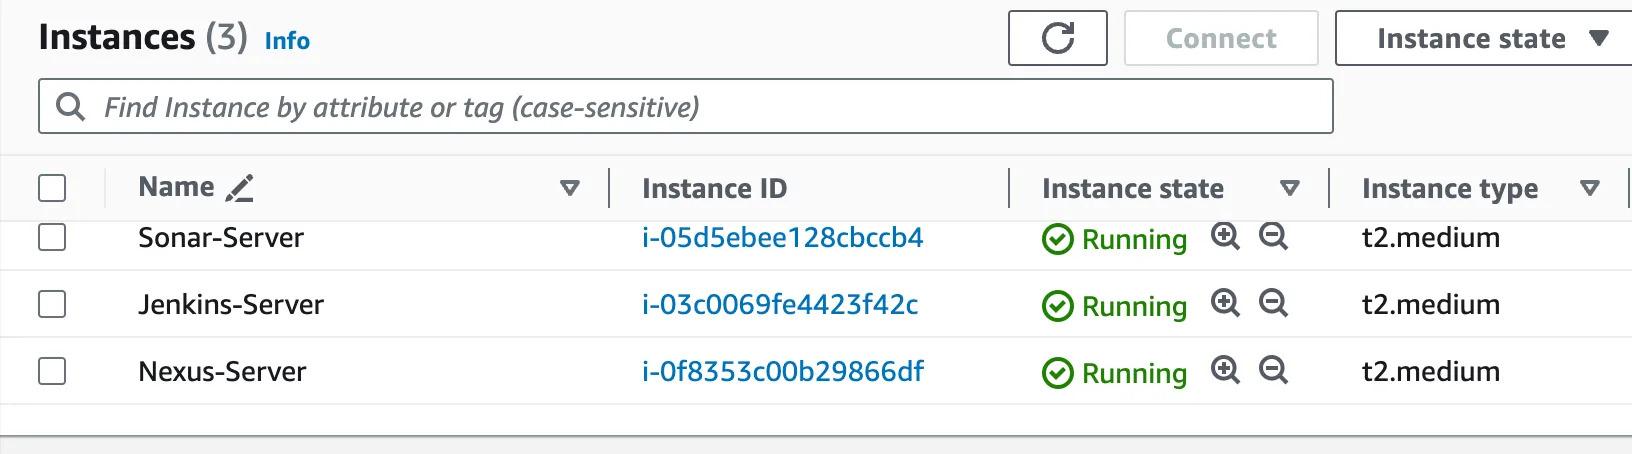
Với Security Groups đã được thiết lập, bước quan trọng tiếp theo là khởi tạo các máy chủ EC2 để cài đặt Jenkins, Nexus và SonarQube. Đây là bước nền tảng giúp triển khai các công cụ DevOps quan trọng, tiến gần hơn đến một môi trường làm việc hoàn chỉnh và tích hợp.
Trong dự án này, chúng ta sẽ sử dụng User Data Script để tự động cài đặt các công cụ cần thiết, đảm bảo các thông số tối ưu để chúng hoạt động hiệu quả. Lưu ý rằng quá trình này sẽ phát sinh chi phí, chủ yếu phụ thuộc vào loại instance được chọn. Việc tận dụng User Data Script giúp đơn giản hóa quá trình triển khai Jenkins, Nexus và SonarQube, tối ưu hóa quy trình DevOps trên nền tảng đám mây, đồng thời kiểm soát chi phí liên quan đến cấu hình instance.
Cài đặt Jenkins
Trên bảng điều khiển EC2, điều hướng đến phần Instances và bắt đầu tạo một instance mới bằng cách chọn "Launch Instance". Thiết lập các thông số sau:
- AWS Region: Chọn vùng phù hợp theo nhu cầu, duy trì sự nhất quán trong toàn bộ dự án.
- Tên instance: Đặt tên cho máy chủ, ví dụ: "Jenkins Server".
- Amazon Machine Image (AMI): Chọn "Ubuntu Server 22.04 LTS (HVM), SSD Volume Type", đảm bảo phù hợp với free tier nếu có thể.
- Loại instance: Chọn "t2.medium" để có đủ tài nguyên cho Jenkins hoạt động ổn định.
- Key Pair: Sử dụng Key Pair đã tạo trước đó để đảm bảo truy cập an toàn.
- Security Group: Chọn "Jenkins-SG", đảm bảo rằng các quy tắc truy cập đã được thiết lập đúng.
- User Data Script: (Dùng để tự động cài đặt Jenkins khi khởi động instance)
Dưới đây là User Data Script cài đặt Jenkins trên Ubuntu:
#!/bin/bash
sudo apt update
sudo apt install openjdk-11-jdk -y
sudo apt install openjdk-17-jdk -y
sudo apt install maven -y
curl -fsSL https://pkg.jenkins.io/debian-stable/jenkins.io-2023.key | sudo tee \
/usr/share/keyrings/jenkins-keyring.asc > /dev/null
echo deb [signed-by=/usr/share/keyrings/jenkins-keyring.asc] \
https://pkg.jenkins.io/debian-stable binary/ | sudo tee \
/etc/apt/sources.list.d/jenkins.list > /dev/null
sudo apt-get update
sudo apt-get install jenkins -y
sudo systemctl start jenkins
sudo systemctl enable jenkins
###Sau khi tạo instance thành công, bạn có thể kiểm tra Jenkins bằng cách truy cập địa chỉ IP của instance trên cổng 8080:
http://<Public_IP>:8080Bước tiếp theo là thiết lập Nexus và SonarQube bằng cách sử dụng phương pháp tương tự với User Data Script. 🚀
Cài đặt Nexus
Trên bảng điều khiển EC2, điều hướng đến phần Instances và tạo một instance mới bằng cách chọn "Launch Instance". Thiết lập các thông số sau:
- AWS Region: Chọn cùng vùng với Jenkins để đảm bảo kết nối nội bộ nhanh chóng và ổn định.
- Tên instance: Đặt tên cho máy chủ, ví dụ: "Nexus Server".
- Amazon Machine Image (AMI): Chọn "Ubuntu Server 22.04 LTS (HVM), SSD Volume Type", đảm bảo phù hợp với free tier nếu có thể.
- Loại instance: Chọn "t2.medium", đủ tài nguyên cho Nexus hoạt động.
- Key Pair: Sử dụng Key Pair đã tạo trước đó để đảm bảo truy cập an toàn.
- Security Group: Chọn "Nexus-SG", đảm bảo các quy tắc truy cập đúng với yêu cầu bảo mật.
- User Data Script: (Dùng để tự động cài đặt Nexus khi khởi động instance)
Dưới đây là User Data Script cài đặt Jenkins trên Ubuntu:
#!/bin/bash

set -e  # Dừng script nếu có lỗi

# Cập nhật hệ thống
echo "🔄 Đang cập nhật hệ thống..."
sudo apt update -y
sudo apt upgrade -y

# Cài đặt Java 17
echo "☕ Cài đặt OpenJDK 17..."
sudo apt install -y openjdk-17-jdk wget tar

# Kiểm tra Java
java -version
echo "✅ Java đã được cài đặt!"

# Tạo user Nexus
echo "👤 Tạo user 'nexus'..."
sudo useradd -m -d /opt/nexus -s /bin/bash nexus
sudo passwd -d nexus  # Xóa mật khẩu để Nexus không yêu cầu login
sudo usermod -aG sudo nexus  # Thêm quyền sudo (nếu cần)

# Tải Nexus
echo "⬇️ Đang tải Nexus Repository Manager..."
cd /tmp
NEXUS_VERSION="3.76.1-01"
wget -q https://download.sonatype.com/nexus/3/nexus-${NEXUS_VERSION}-unix.tar.gz

# Giải nén và di chuyển Nexus
echo "📦 Giải nén và cài đặt Nexus..."
sudo mkdir -p /opt/nexus
sudo tar -xzf nexus-${NEXUS_VERSION}-unix.tar.gz -C /opt/nexus --strip-components=1

# Cấu hình quyền cho Nexus
sudo chmod 775 /opt
sudo chown root:nexus /opt
sudo chown -R nexus:nexus /opt/nexus
sudo chmod -R 775 /opt/nexus
sudo mkdir -p /opt/nexus/sonatype-work
sudo chown -R nexus:nexus /opt/nexus/sonatype-work
sudo chmod -R 775 /opt/nexus/sonatype-work

# Cấu hình run_as_user cho Nexus
echo "🔧 Cấu hình Nexus..."
echo 'run_as_user="nexus"' | sudo tee -a /opt/nexus/bin/nexus.rc

# Cấu hình Nexus chạy dưới dạng systemd service
echo "🛠️ Tạo Nexus service..."
sudo tee /etc/systemd/system/nexus.service > /dev/null <<EOT
[Unit]
Description=Nexus Repository Manager
After=network.target

[Service]
Type=forking
User=nexus
Group=nexus
LimitNOFILE=65536
Environment=JAVA_HOME=/usr/lib/jvm/java-17-openjdk-amd64
TimeoutStartSec=300
WorkingDirectory=/opt/nexus
ExecStart=/opt/nexus/bin/nexus start
ExecStop=/opt/nexus/bin/nexus stop
Restart=on-failure

[Install]
WantedBy=multi-user.target
EOT

# Reload systemd và kích hoạt Nexus service
echo "🔄 Kích hoạt và khởi động Nexus..."
sudo systemctl daemon-reload
sudo systemctl enable nexus
sudo systemctl start nexus

# Kiểm tra trạng thái Nexus
echo "📡 Kiểm tra trạng thái Nexus..."
sudo systemctl status nexus --no-pager

# Hiển thị thông tin truy cập
echo "✅ Cài đặt Nexus thành công!"
echo "🌐 Truy cập Nexus tại: http://$(hostname -I | awk '{print $1}'):8081"
Truy cập giao diện Nexus
Sau khi Nexus được cài đặt thành công, bạn có thể truy cập Nexus Repository Manager bằng cách mở trình duyệt và nhập địa chỉ:
http://<Public_IP>:8081Lưu ý:
- Mật khẩu admin mặc định của Nexus có thể tìm thấy tại:
Bạn có thể sử dụng lệnh sau để lấy mật khẩu:/opt/nexus/sonatype-work/nexus3/admin.password
Bước tiếp theo là thiết lập SonarQube.
Cài đặt SonarQube
Trên bảng điều khiển EC2, điều hướng đến phần Instances và tạo một instance mới bằng cách chọn "Launch Instance". Thiết lập các thông số sau:
- AWS Region: Chọn cùng vùng với Jenkins để tối ưu hóa kết nối nội bộ.
- Tên instance: Đặt tên cho máy chủ, ví dụ: "Sonar-Server".
- Amazon Machine Image (AMI): Chọn "Ubuntu Server 22.04 LTS (HVM), SSD Volume Type" (hỗ trợ free tier nếu có).
- Loại instance: Chọn "t2.medium" để đảm bảo hiệu suất hoạt động của SonarQube.
- Key Pair: Sử dụng Key Pair đã tạo trước đó để đảm bảo truy cập an toàn.
- Security Group: Chọn "Sonar-SG", đảm bảo các quy tắc truy cập phù hợp với bảo mật.
- User Data Script: (Dùng để tự động cài đặt SonarQube khi khởi động instance)
User Data Script để cài đặt SonarQube trên Ubuntu
#!/bin/bash

# Update system
sudo apt update -y

# Configure sysctl settings
sudo tee -a /etc/sysctl.conf > /dev/null <<EOT
vm.max_map_count=262144
fs.file-max=65536
ulimit -n 65536
ulimit -u 4096
EOT


# Install PostgreSQL
sudo sh -c 'echo "deb http://apt.postgresql.org/pub/repos/apt/ $(lsb_release -cs)-pgdg main" >> /etc/apt/sources.list.d/pgdg.list'
wget -q https://www.postgresql.org/media/keys/ACCC4CF8.asc -O - | sudo apt-key add -
sudo apt install postgresql postgresql-contrib -y
sudo systemctl enable postgresql
sudo systemctl start postgresql

# Configure PostgreSQL for SonarQube
sudo passwd postgres
sudo -u postgres createuser sonar
sudo -u postgres psql -c "ALTER USER sonar WITH ENCRYPTED PASSWORD 'admin123';"
sudo -u postgres psql -c "CREATE DATABASE sonarqube OWNER sonar;"
sudo -u postgres psql -c "GRANT ALL PRIVILEGES ON DATABASE sonarqube TO sonar;"

# Install Java 17 and unzip
sudo apt-get install openjdk-17-jdk -y
sudo apt-get install unzip -y

# Download and configure SonarQube
sudo wget https://binaries.sonarsource.com/Distribution/sonarqube/sonarqube-10.3.0.82913.zip
sudo unzip sonarqube-10.3.0.82913.zip
sudo mv sonarqube-10.3.0.82913 /opt/sonarqube
sudo groupadd sonar
sudo useradd -d /opt/sonarqube -g sonar sonar
sudo chown sonar:sonar /opt/sonarqube -R

# Download SonarQube Community Branch Plugin
cd /opt/sonarqube/extensions/plugins
sudo wget https://github.com/mc1arke/sonarqube-community-branch-plugin/releases/download/1.18.0/sonarqube-community-branch-plugin-1.18.0.jar

# Configure sonar.properties
sudo tee -a /opt/sonarqube/conf/sonar.properties > /dev/null <<EOT
sonar.jdbc.username=sonar
sonar.jdbc.password=admin123
sonar.jdbc.url=jdbc:postgresql://localhost:5432/sonarqube
sonar.web.javaAdditionalOpts=-javaagent:/opt/sonarqube/extensions/plugins/sonarqube-community-branch-plugin-1.18.0.jar=web
sonar.ce.javaAdditionalOpts=-javaagent:/opt/sonarqube/extensions/plugins/sonarqube-community-branch-plugin-1.18.0.jar=ce
EOT

# Configure SonarQube as a service
sudo tee /etc/systemd/system/sonar.service > /dev/null <<EOT
[Unit]
Description=SonarQube service
After=syslog.target network.target

[Service]
Type=forking
ExecStart=/opt/sonarqube/bin/linux-x86-64/sonar.sh start
ExecStop=/opt/sonarqube/bin/linux-x86-64/sonar.sh stop
User=sonar
Group=sonar
Restart=always
LimitNOFILE=65536
LimitNPROC=4096

[Install]
WantedBy=multi-user.target
EOT

sudo systemctl enable sonar
sudo systemctl start sonar
sudo systemctl status sonar

# Install and configure Nginx
sudo apt-get install nginx -y
sudo rm -rf /etc/nginx/sites-enabled/default
sudo rm -rf /etc/nginx/sites-available/default

sudo tee /etc/nginx/sites-available/sonarqube > /dev/null <<EOL
server {
    listen 80;
    server_name _;

    access_log  /var/log/nginx/sonar.access.log;
    error_log   /var/log/nginx/sonar.error.log;

    location / {
        proxy_pass http://localhost:9000;
        proxy_redirect off;
        proxy_http_version 1.1;
        proxy_set_header Upgrade \$http_upgrade;
        proxy_set_header Connection 'upgrade';
        proxy_set_header Host \$host;
        proxy_set_header X-Real-IP \$remote_addr;
        proxy_set_header X-Forwarded-For \$proxy_add_x_forwarded_for;
        proxy_set_header X-Forwarded-Proto \$scheme;
        proxy_cache_bypass \$http_upgrade;
    }
}
EOL


sudo ln -s /etc/nginx/sites-available/sonarqube /etc/nginx/sites-enabled/sonarqube
sudo systemctl enable nginx.service
sudo systemctl restart nginx.service

# Configure firewall
sudo ufw enable
sudo ufw allow 22,80,9000,9001/tcp

echo "System reboot in 30 sec"
sleep 30
reboot
Truy cập giao diện SonarQube
Sau khi cài đặt thành công, bạn có thể truy cập SonarQube Dashboard bằng cách mở trình duyệt và nhập địa chỉ:
http://<Public_IP>Thông tin đăng nhập mặc định:
- Username:
admin - Password:
admin
Khi đăng nhập lần đầu, SonarQube sẽ yêu cầu bạn đổi mật khẩu.
Bây giờ, bạn đã hoàn thành việc cài đặt SonarQube, sẵn sàng tích hợp vào pipeline CI/CD của bạn! 🚀
Kiểm tra cài đặt và thiết lập Jenkins
Sau khi các server đã được khởi tạo, bước tiếp theo là SSH vào từng server để kiểm tra cài đặt và xác nhận Jenkins, Nexus, SonarQube hoạt động đúng.
1. Kết nối vào Jenkins Server qua SSH
Trên terminal hoặc command prompt, chạy lệnh sau để SSH vào Jenkins Server:
ssh -i /path/to/your-key.pem ubuntu@<JENKINS_SERVER_PUBLIC_IP>Lưu ý:
- Thay
/path/to/your-key.pembằng đường dẫn đến Key Pair đã tạo. - Thay
<JENKINS_SERVER_PUBLIC_IP>bằng địa chỉ IP công khai của Jenkins Server.
2. Kiểm tra trạng thái của Jenkins
Sau khi SSH vào thành công, kiểm tra xem Jenkins có đang chạy không:
sudo systemctl status jenkinsNếu Jenkins đang chạy, bạn sẽ thấy trạng thái "active (running)". Nếu chưa, bạn có thể khởi động lại Jenkins bằng lệnh:
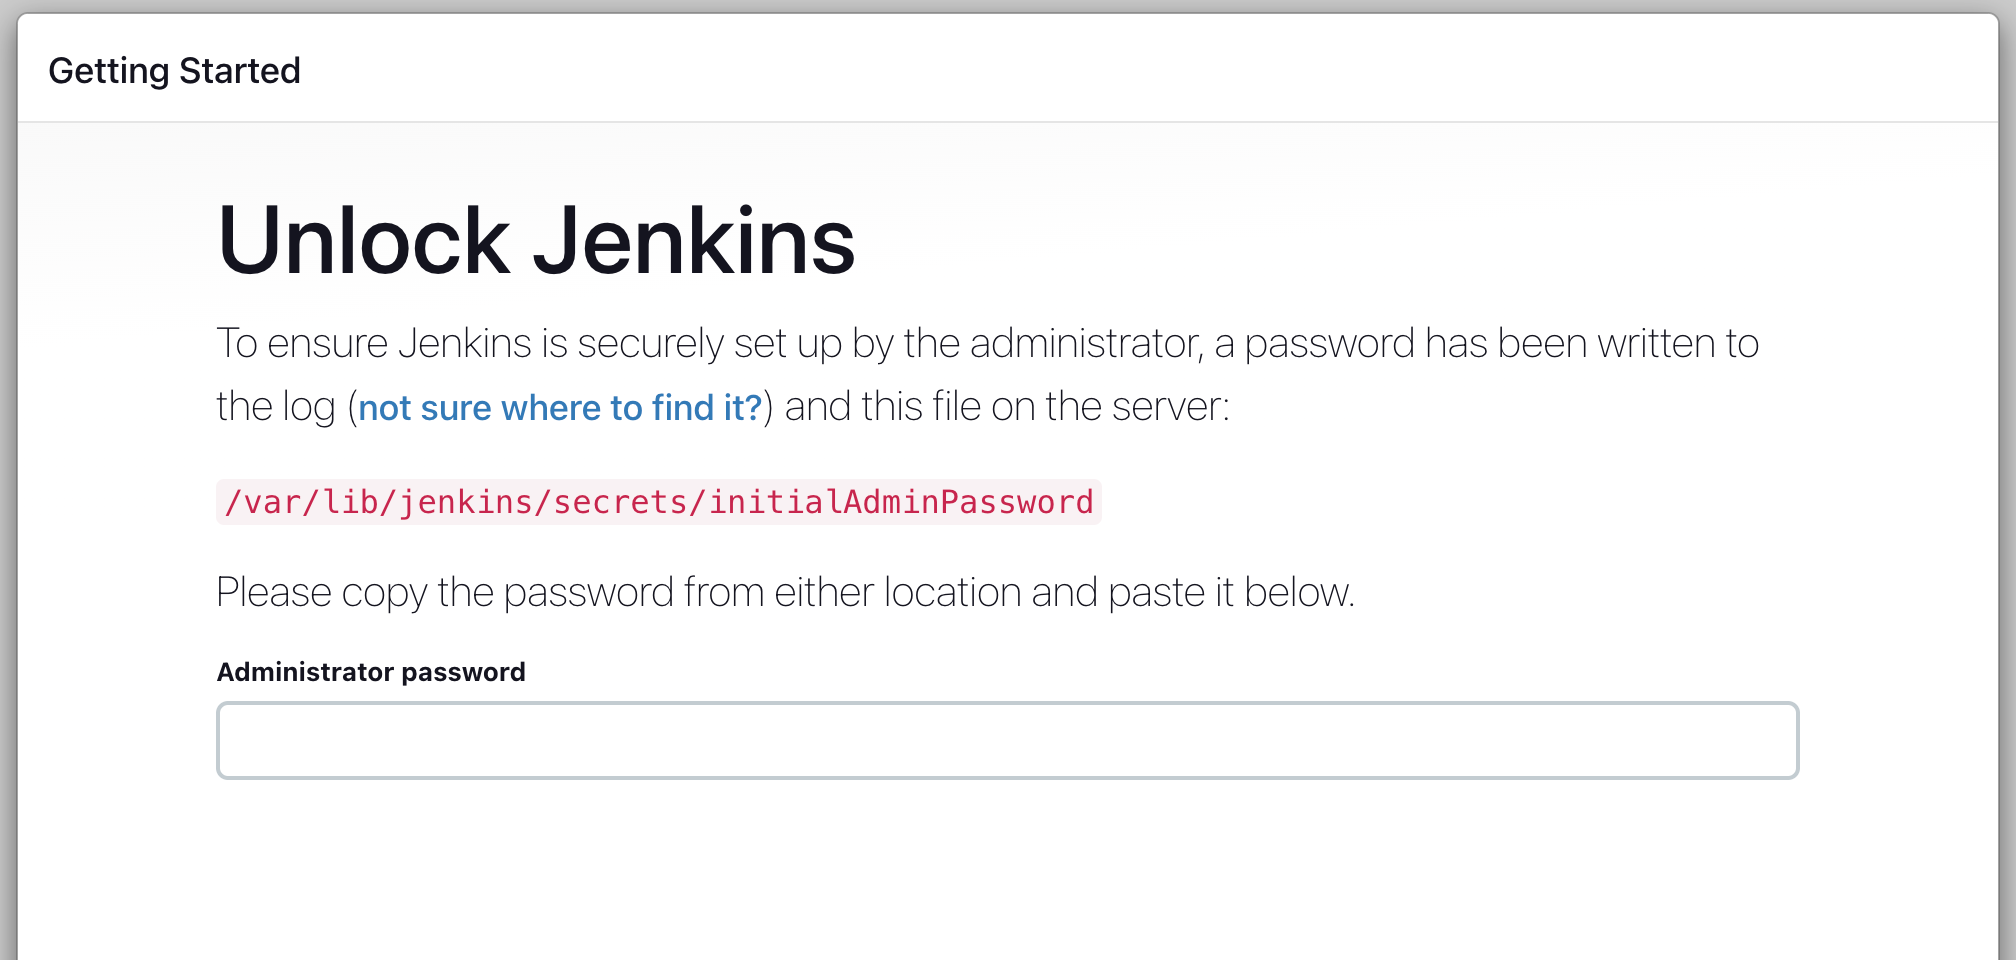
sudo systemctl restart jenkins3. Lấy mật khẩu đăng nhập Jenkins lần đầu
Jenkins yêu cầu nhập mật khẩu admin lần đầu để truy cập. Lấy mật khẩu bằng lệnh:
sudo cat /var/lib/jenkins/secrets/initialAdminPasswordCopy mật khẩu này và sử dụng để đăng nhập Jenkins tại:
http://<JENKINS_SERVER_PUBLIC_IP>:8080This command will display the administrator password on the terminal. Copy the password and paste it into the provided box in the Jenkins web interface.


The main powerhouse of Jenkins is its plugins. So we’ll proceed with installing the suggested Plugins and creating an admin user. By doing this we would have completed the post installation steps for Jenkins.


Now that Jenkins is primed for action, the next step is to install the plugins that unlock the features necessary for the integration with other services in our DevOps workflow.
To install the plugins, follow these steps in the Jenkins Console:
- Click on “Manage Jenkins.”
- Navigate to “Plugins.”
- In the left navigation pane, select “Available Plugins.”
- Search for the following plugins: Maven Integration, GitHub Integration, Nexus Artifact Uploader, SonarQube Scanner, Slack Notification, and Build Timestamp.
- Put a checkmark on each of the identified plugins.
- Click “Install” to initiate the installation process.


With the successful installation of plugins and the completion of post-installation setup, Jenkins is now fully configured and ready to drive your DevOps workflow. This comprehensive setup, encompassing admin user creation and plugin integration, establishes a robust foundation for building, testing, and deploying software in a continuous integration environment.
Now we would do the post installation steps for Nexus. First we need to SSH into the nexus server to confirm the service is running.

The next step is to access the web interface for Nexus. Open your web browser and navigate to the Nexus web interface. Typically, Nexus Repository Manager employs port 8081. So the url would take this format;
http://nexus_server_ip:8081
Upon navigating to the Nexus web interface, locate and select the “Sign In” option. Here, you’ll be prompted to enter the admin password, which is conveniently stored in a specific file path displayed on the Nexus sign-in dashboard. Execute the following command on your Nexus server terminal to access this password:
sudo cat /opt/nexus/sonatype-work/nexus3/admin.password
Copy the password from the terminal output, and paste it into the provided box on the Nexus sign-in page. Subsequently, click on “Sign In.”


Upon successful sign-in, you will be prompted to create a new password for heightened security. For simplicity and modularity within your pipeline code, consider using a password like “admin123.” Follow these steps:
- Enter the copied password or the one you’ve chosen into the appropriate field.
- Click on “Sign In.”
- Now, create a new password when prompted. Make sure to note this password for future use.
- Choose the radio button for “Disable anonymous access” to enhance security.
- Click on “Finish” to complete the initial setup.
From our architecture, we are going to upload artifacts to nexus and also download dependencies from nexus. So the next step is to create the repositories where the nexus server will upload the artifact to. To do this;
Access Nexus Web Interface:
- Navigate to the Nexus web interface.
- Click on the settings icon, usually represented as a gear or wrench, in the top-right corner.
- Navigate to Repositories Section:
- In the left navigation pane, select “Repositories.”


Create Maven2 (Hosted) Repository for Artifacts:
- Click on “Create repository.”
- Choose the repository format as “maven2 (hosted).”
- Set a unique name, for example, “vprofile-release.”
- Leave other settings as default.
- Click “Create repository.”


Create Maven2 (Hosted) Repository for Snapshots:
- Follow the same steps as above but create another “maven2 (hosted)” repository.
- Name it, for instance, “vprofile-snapshots.”
- Change version policy to Snapshot.
- Leave other settings as default.
- Click “Create repository.”


Create Maven2 (Proxy) Repository for Dependencies:
- Once again, click on “Create repository.”
- Select the repository format as “maven2 (proxy).”
- Choose a distinct name like “vpro-maven-central”
- Specify the Remote Storage Location (URL of the Maven repository from which dependencies will be proxied).
- Leave other settings as default.
- Click “Create repository.”


Create Maven2 (Group) Repository:
- For the group repository that combines all three types, click on “Create repository.”
- This time, select the repository format as “maven2 (group).”
- Assign a name like “vpro-maven-group.”
- Include the previously created hosted and proxy repositories in the “Member repositories” section.
- Leave other settings as default.
- Click “Create repository.”


By following these steps, we’ve created the necessary repositories in Nexus for storing artifacts, handling snapshots, downloading dependencies, and grouping them together. Note down the names of each repository as you’ll use them in your pipeline code for integration with Nexus.
Continuing with the post-installation phase for SonarQube, if the user data script executed successfully, you can seamlessly proceed to the web interface for authentication using default credentials being “admin” as username and password.
But so Sonar wouldn’t feel left out, we’ll ssh into it and confirm the service is running using the command;
sudo systemctl status sonar

Then proceed to the web interface to sign in. To login, we’ll use the default credentials; “admin” for username and password. You’ll be prompted to change the password.


Now all the services have been setup and verified. It’s time to begin our Continuous Integration journey.
See you sometime soon.


Bình luận (0)