
Triển Khai CI/CD Cho Dự Án Laravel Staging Và Production - Jenkins - Docker - Ansible Chuyên mục Devops 2024-05-14 50 Lượt xem 45 Lượt thích 0 Bình luận

Chuẩn Bị Server
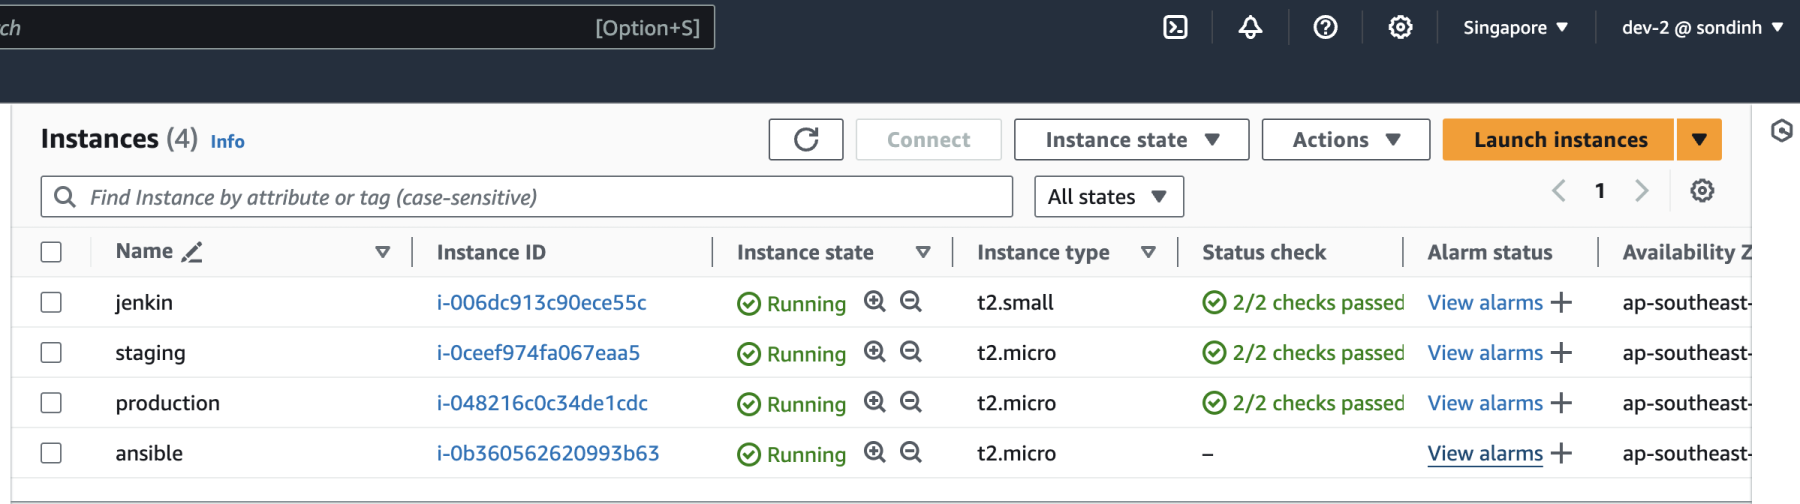
Mình tạo ra 3 servers với OS Ubuntu 20.04 lần lượt như sau:
- Server Jenkin (Mình triển khai Asible trong server Jenkin).
- Server Stanging.
- Server Production.
Cấu Hình Dự Án
- Bước 1: Install dự án Laravel.
- Bước 2: Cài đặt một số packages để test ứng dung:
- Unit test: Thêm file .env.testing và cấu hình mysql config nếu ứng dụng của các bạn thực thi test có liên quan đến cơ sở dữ liệu. Để test:
-
php artisan test
-
- Code coverage: Để chạy code coverage chúng ta cần phải tải xdebug.
- For mac:
-
mkdir /opt/homebrew/lib/php/pecl pecl install xdebug php -v -
XDEBUG_MODE=coverage ./vendor/bin/phpunit --coverage-html 'reports/coverage'
-
- For OS khác: Link
- Test:
-
vendor/bin/phpunit --coverage-html 'reports/coverage'
-
- For mac:
- Static code analysis larastan (PHPstan):
-
composer require --dev nunomaduro/larastan - Tại thư mục gốc tạo thêm file : phpstan.neon
-
includes: - ./vendor/nunomaduro/larastan/extension.neon - phpstan-baseline.neon parameters: paths: - app - config - database # - routes # The level 9 is the highest level level: 5 ignoreErrors: - '#Missing PHPDoc tag @var#' parallel: maximumNumberOfProcesses: 4 noUnnecessaryCollectionCall: false checkMissingIterableValueType: false reportUnmatchedIgnoredErrors: false - Guide: Link
-
- Test:
-
./vendor/bin/phpstan analyse app --memory-limit=25 - Thêm phpstan-baseline (optional) : Tạo thêm một file là phpstan-baseline.neon ở thư mục gốc của bạn. và chạy với cmd sau:
-
./vendor/bin/phpstan analyse --memory-limit=2G \ --configuration phpstan.neon \ --generate-baseline
-
-
-
- Static code analysis phpcs
- Cài đặt:
-
composer require --dev squizlabs/php_codesniffer - Tạo thêm file phpcs.xml ở thư mục gốc và thêm config sau:
-
<?xml version="1.0"?>
<ruleset name="Laravel Standards">
    <description>PSR-2 for Laravel Project</description>
    <!-- <file>./app</file> -->
    <file>./database</file>
    <file>./routes</file>
    <!-- <file>./tests</file> -->
    <!-- Ignore line ending because different developer may use different OS -->
    <rule ref="PSR2">
        <exclude name="Generic.Files.LineEndings"/>
    </rule>

    <rule ref="Squiz.NamingConventions.ValidVariableName">
        <exclude-pattern>./app/Models</exclude-pattern>
        <!-- <exclude-pattern>./app/Http/Controllers/Client</exclude-pattern> -->
        <!-- <exclude-pattern>./app/Http/Controllers/Api</exclude-pattern> -->
        <exclude-pattern>./app/Http/Resources</exclude-pattern>
        <exclude-pattern>./app/Service</exclude-pattern>
        <exclude-pattern>./app/Repository</exclude-pattern>
        <exclude-pattern>./app/Observers</exclude-pattern>
        <exclude-pattern>./app/Console</exclude-pattern>
        <exclude-pattern>./app/Mail</exclude-pattern>
    </rule>
    <rule ref="Generic.NamingConventions.CamelCapsFunctionName"/>
    <rule ref="Generic.Debug.JSHint"/>
    <rule ref="Generic.Debug.CSSLint"/>
    <rule ref="Generic.NamingConventions.UpperCaseConstantName"/>
    <!-- Ignore missing namespace rule for Laravel 5.2, because this version doesn't need in those files -->
    <rule ref="PSR1.Classes.ClassDeclaration.MissingNamespace">
        <!-- <exclude-pattern>./tests</exclude-pattern> -->
        <exclude-pattern>./database</exclude-pattern>
    </rule>
    <rule ref="Squiz.NamingConventions.ValidVariableName">
        <!-- <exclude-pattern>./tests</exclude-pattern> -->
    </rule>

    <rule ref="Generic.Files.LineLength">
    <properties>
        <property name="lineLimit" value="180"/>
        <property name="absoluteLineLimit" value="0"/>
    </properties>
    </rule>

    <rule ref="Squiz.Scope.MemberVarScope"/>
    <rule ref="Squiz.Scope.StaticThisUsage"/>


    <rule ref="Generic.CodeAnalysis.EmptyStatement"/>
    <rule ref="Generic.Formatting.DisallowMultipleStatements"/>
    <rule ref="Generic.Formatting.SpaceAfterCast"/>
    <rule ref="Generic.WhiteSpace.DisallowTabIndent"/>
    <rule ref="Generic.Metrics.NestingLevel">
        <exclude-pattern>./app/Repository/DeviceRepository.php</exclude-pattern>
        <exclude-pattern>./app/Console/Commands/ProfitNoticeCommand.php</exclude-pattern>
        <properties>
            <property name="nestingLevel" value="3"/>
            <property name="absoluteNestingLevel" value="6"/>
        </properties>
    </rule>
    <rule ref="Generic.WhiteSpace.ScopeIndent"/>
    <rule ref="Squiz.WhiteSpace.CastSpacing"/>
    <rule ref="Squiz.WhiteSpace.ControlStructureSpacing"/>
    <rule ref="Squiz.WhiteSpace.LanguageConstructSpacing"/>
    <rule ref="Squiz.WhiteSpace.LogicalOperatorSpacing"/>
    <rule ref="Squiz.WhiteSpace.OperatorSpacing"/>
    <rule ref="Squiz.WhiteSpace.PropertyLabelSpacing"/>
    <rule ref="Squiz.WhiteSpace.ScopeClosingBrace"/>
    <rule ref="Squiz.WhiteSpace.ScopeKeywordSpacing"/>
    <rule ref="Squiz.WhiteSpace.SemicolonSpacing"/>

    <exclude-pattern>**/*.js</exclude-pattern>
</ruleset>
-
- Test:
-
./vendor/bin/phpcs
-
- Guide: Link
-
- Cài đặt:
- acceptance test: Cài đặt PHP co-deception
https://codeception.com/for/laravel— và mình đã tạo một test case rất đơn giản trong /tests/acceptance/RegisterCest.php, bạn cần phải tạo thủ công một file Acceptance.php trong thư mục Tests\Support\Helper.-
<?php class RegisterCest { public function tryToTest(AcceptanceTester $I) { $I->amOnPage('/'); $I->see('Documentation'); } } -
<?php namespace Tests\Support\Helper; class Acceptance extends \Codeception\Module { }
-
- Hướng dẫn triển khai lên github: Link hướng dẫn, sau khi để public các bạn chuyển qua thành private nhé!
- Unit test: Thêm file .env.testing và cấu hình mysql config nếu ứng dụng của các bạn thực thi test có liên quan đến cơ sở dữ liệu. Để test:
Triển Khai Jenkin Server
- OS: Ubuntu ec2 instance bản 20.04
- Link cài đặt Jenkin: Link,
- Link Cài đặt php8.1 và Git và Composer : Link các bạn nhớ kéo xuống một chút để cài đặt nhé!
- Login vào user jenkins:
-
su - jenkins - Nếu KHÔNG vào được thì dùng lệnh sau:
-
vi /etc/passwd - Các bạn tìm đến mục login và tìm đến user jenkins chỉnh sửa giống như mình bên dưới đấy:
-
login
...
// Các bạn thay false thành bash để có thể login nhé
jenkins:x:995:993:Jenkins Automation Server:/var/lib/jenkins:/bin/bash
-
-
-
-
Tạo Khóa SSH cho user jenkin:
-
Chạy lệnh sau:
ssh-keygen -t rsa -b 4096 -C "your_email@example.com" - Tuân thủ các hướng dẫn để lưu cặp khóa SSH ở vị trí mặc định (thông thường là ~/.ssh/id_rsa).
-
-
Thêm public key vào GitHub repo:
- Sao chép nội dung của khóa SSH public (~/.ssh/id_rsa.pub).
- Điều hướng đến Setting Repo -> Deploy keys -> Add deploy key hãy paste public key.
- Đặt một tiêu đề có ý nghĩa và lưu.
- Kết nối jenkin với Github:
-
git ls-remote -h your_github_ssh_repo.git HEAD
-
- Login vào user jenkins:
Cấu Hình Jenkin
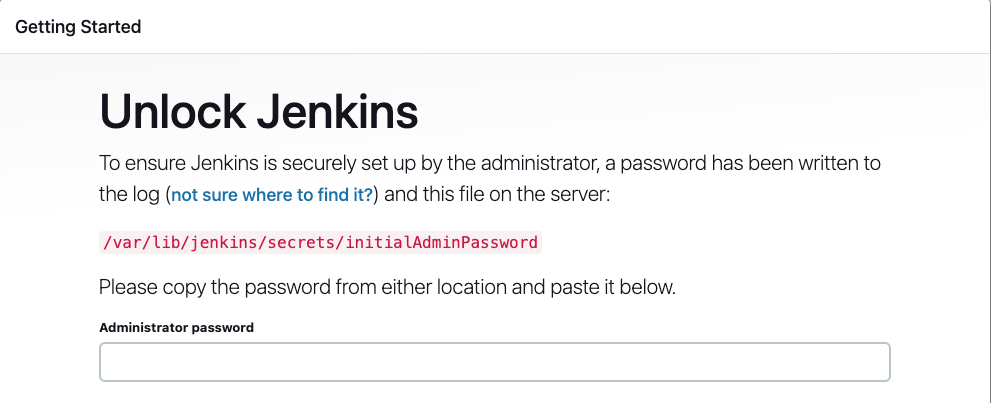
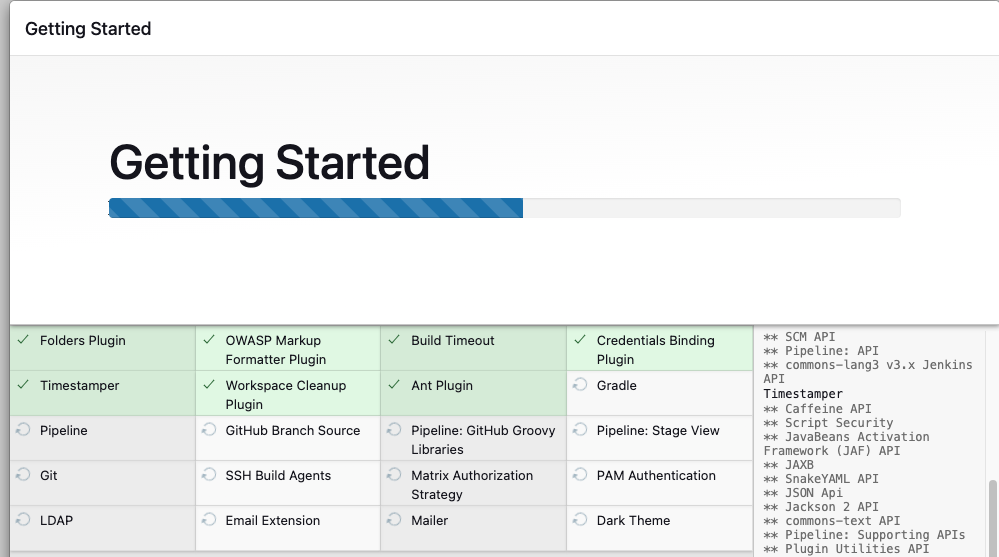
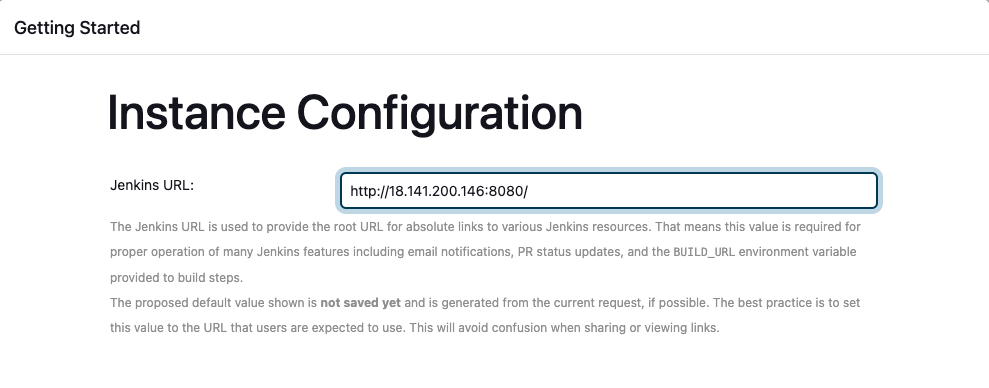
Sau khi cài đặt theo Link mình vừa đề cập ở trên các bạn hãy nhập password mà Jenkin đã genarate ra cho chúng ta để đăng nhập vào màn quản lý:
cat /var/lib/jenkins/secrets/initialAdminPasswordSau đó thì vào đường dẫn: http://your_domain_jenkin_server:8080/ Và thực thi theo các bước sau đây:


Github Configuration Webhook
Nhiệm vụ của webhook là gì ? Khi mình đẩy code lên github thì cái webhook này nó sẽ thông báo cho jenkins là tôi có code mới rồi đó ông deploy cho tôi đi ..chính vì vậy mình phải tạo 1 webhook trên github nhé !
Đầu tiên bạn phải vào repo trên github mà bạn muốn deploy sau đó thì click vào setting và chọn Webhooks sau đó thì click add webhook
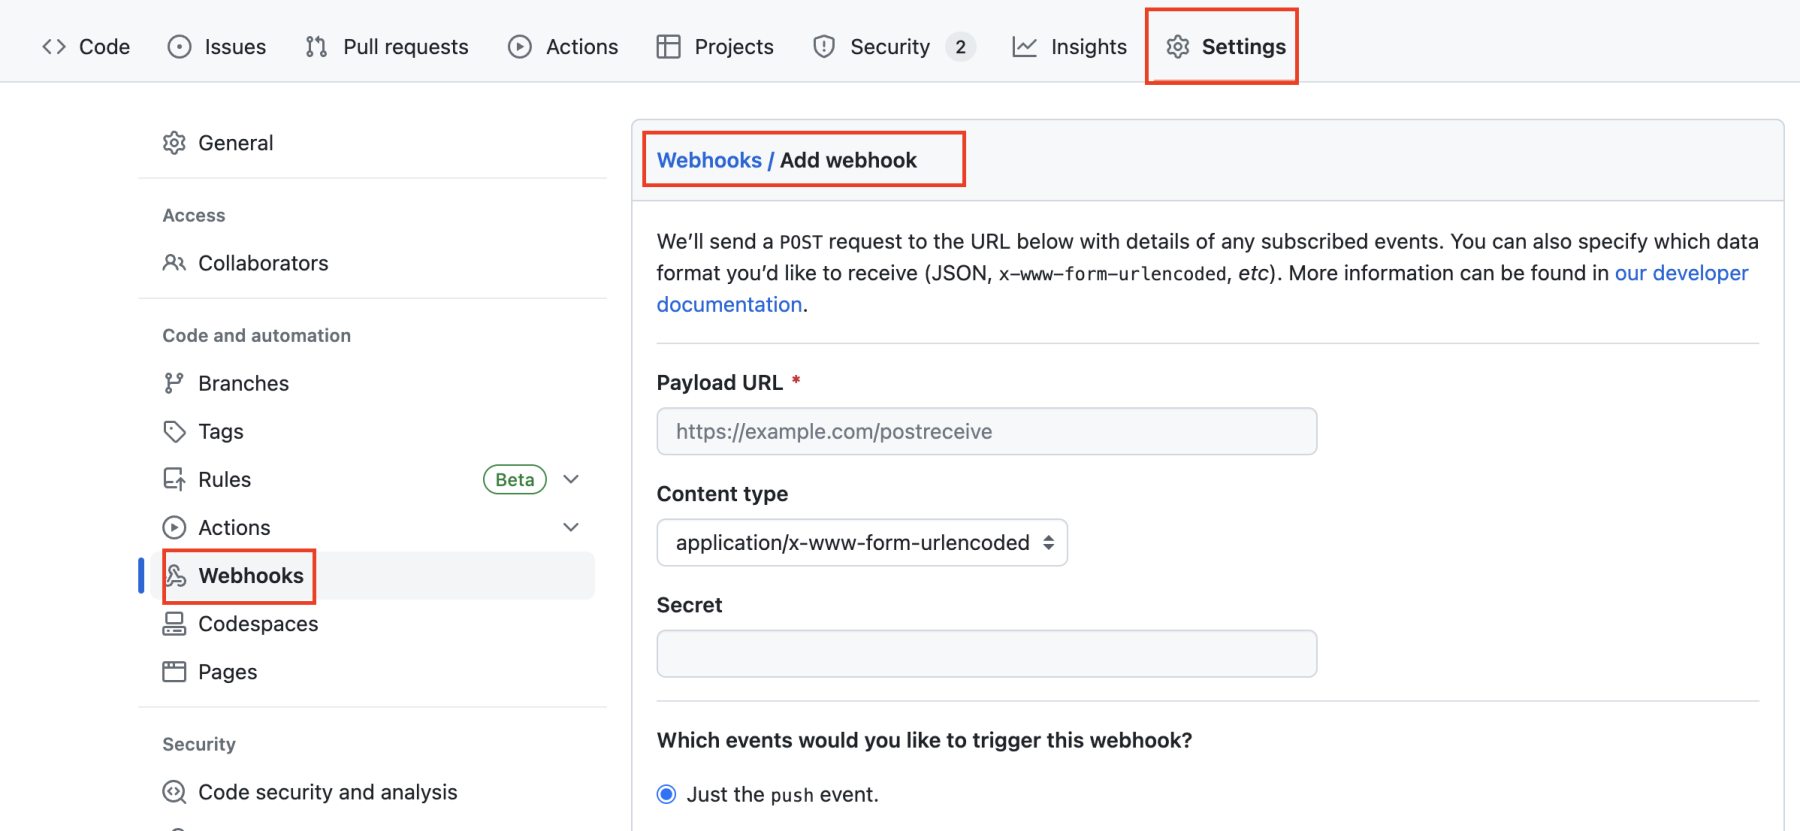
Các bạn cần phải điền 1 số input sau:
- Payload URL: Đây là địa chỉ URL mà GitHub sẽ gửi các HTTP POST requests đến khi sự kiện xảy ra, lấy url jenkin của bạn => http://your_jenkin_domain:port/github-webhook/ ví dụ:
-
http://18.143.166.188:8080/github-webhook/
-
- Secret : Một chuỗi bí mật (secret) được sử dụng để ký và xác minh tính toàn vẹn của dữ liệu gửi từ GitHub đến webhook. Mã bảo mật này được sử dụng để ngăn chặn các cuộc tấn công giả mạo.
- Events: Đây là các loại sự kiện (hoặc events) mà webhook được kích hoạt khi chúng xảy ra. Các loại sự kiện bao gồm push, pull request, issue comments, releases, deployment, và nhiều loại sự kiện khác.
-
Active: Xác định xem webhook có đang hoạt động hay không.
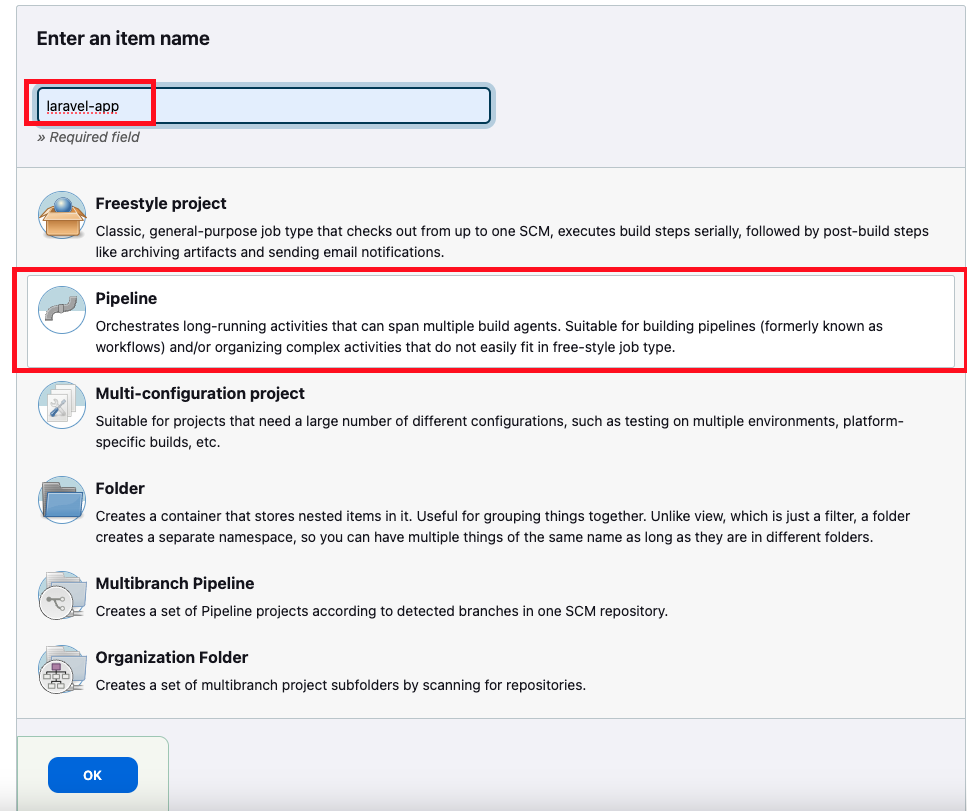
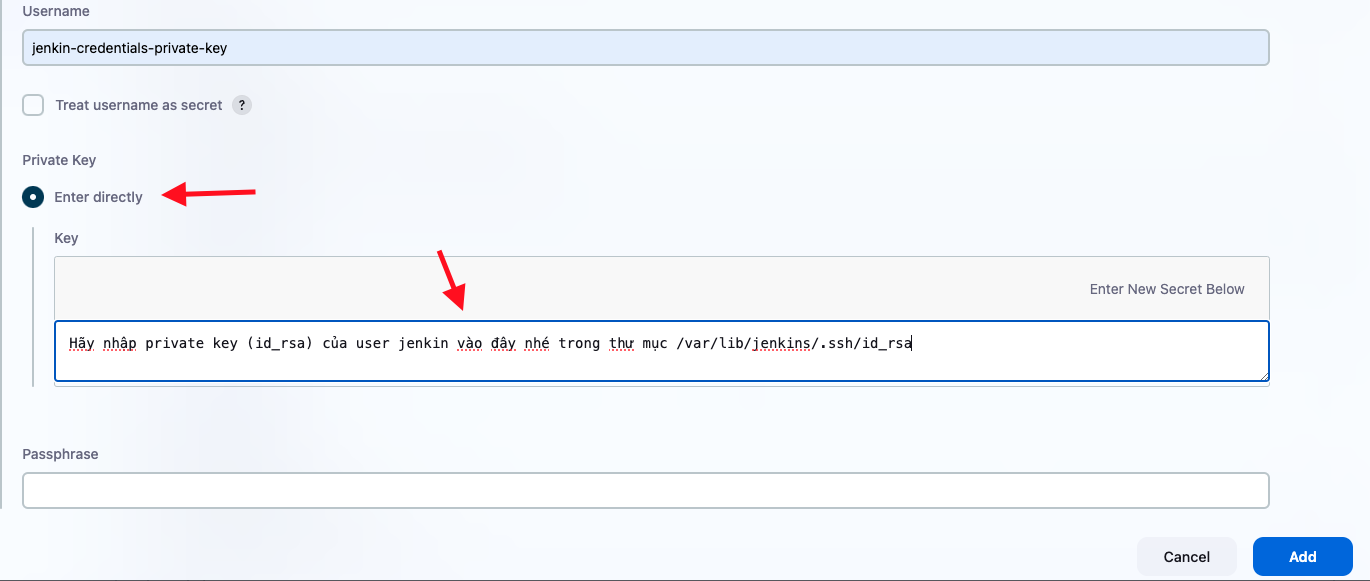
Jenkins Items
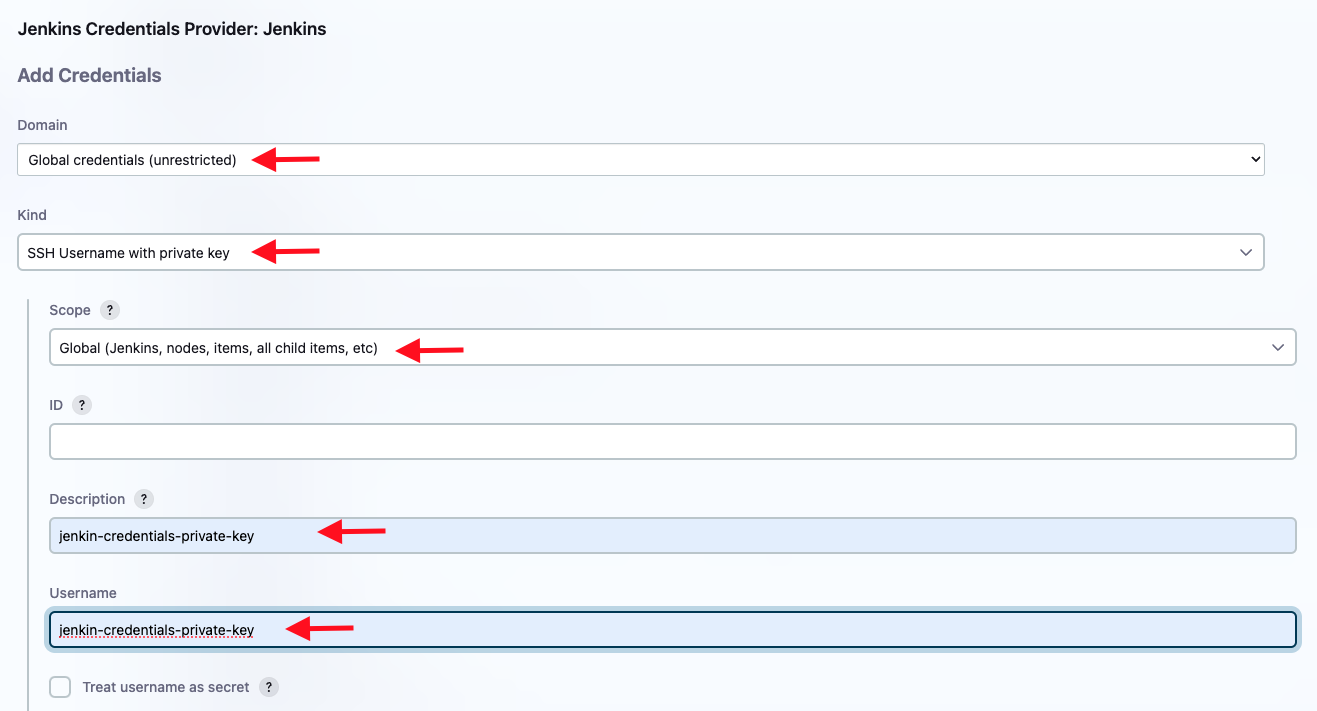
- Nhập private key (id_rsa) của user jenkin trong thư mục /var/lib/jenjins/.ssh/id_rsa
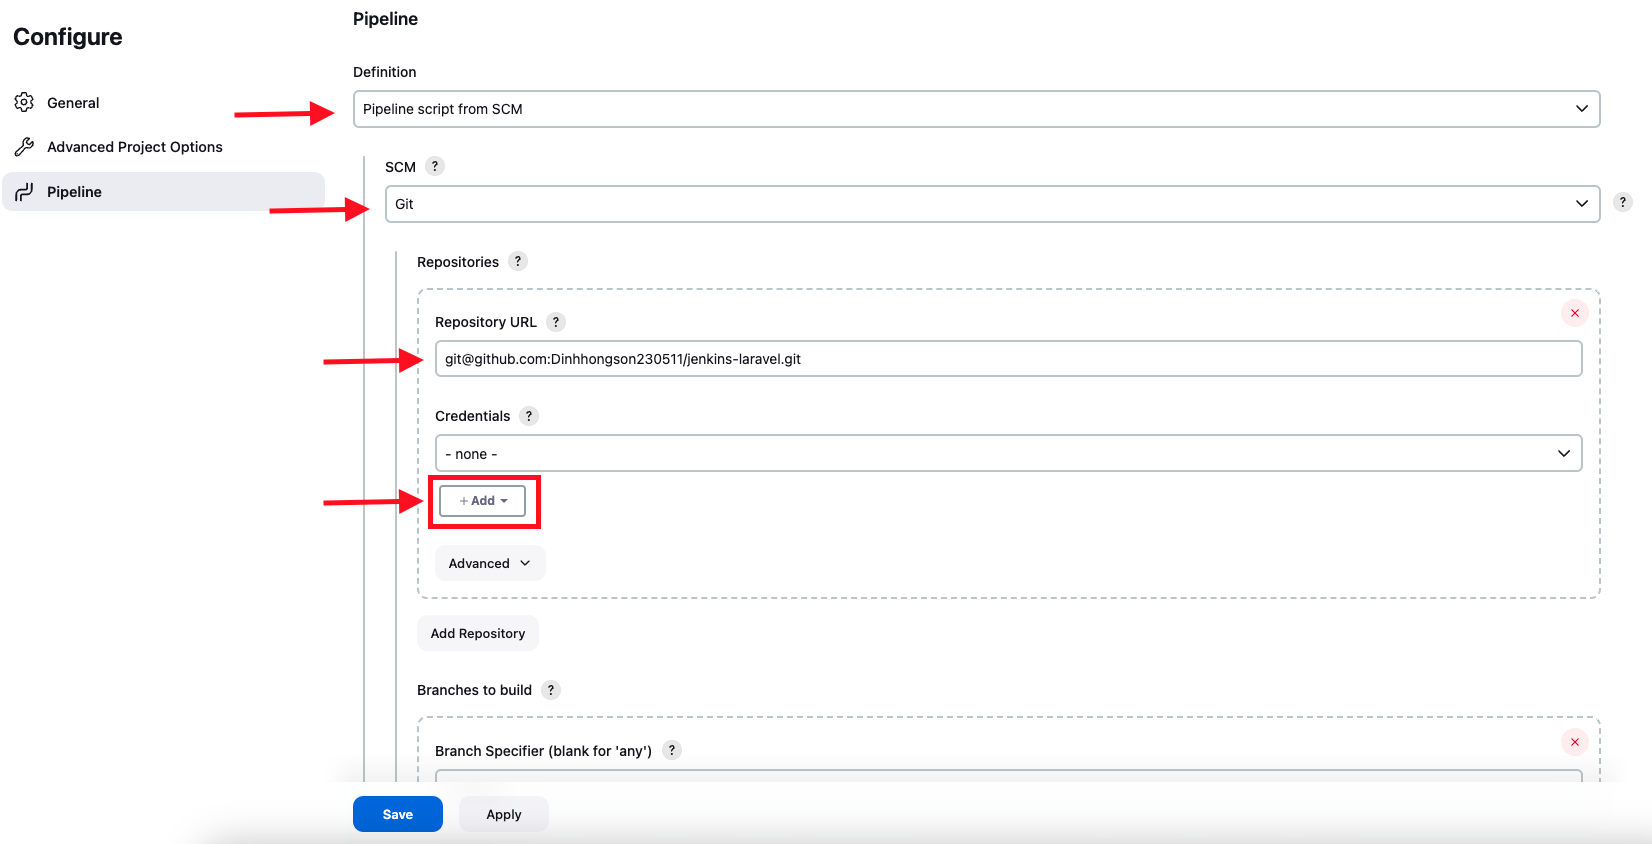
Cấu Hình Pipline File
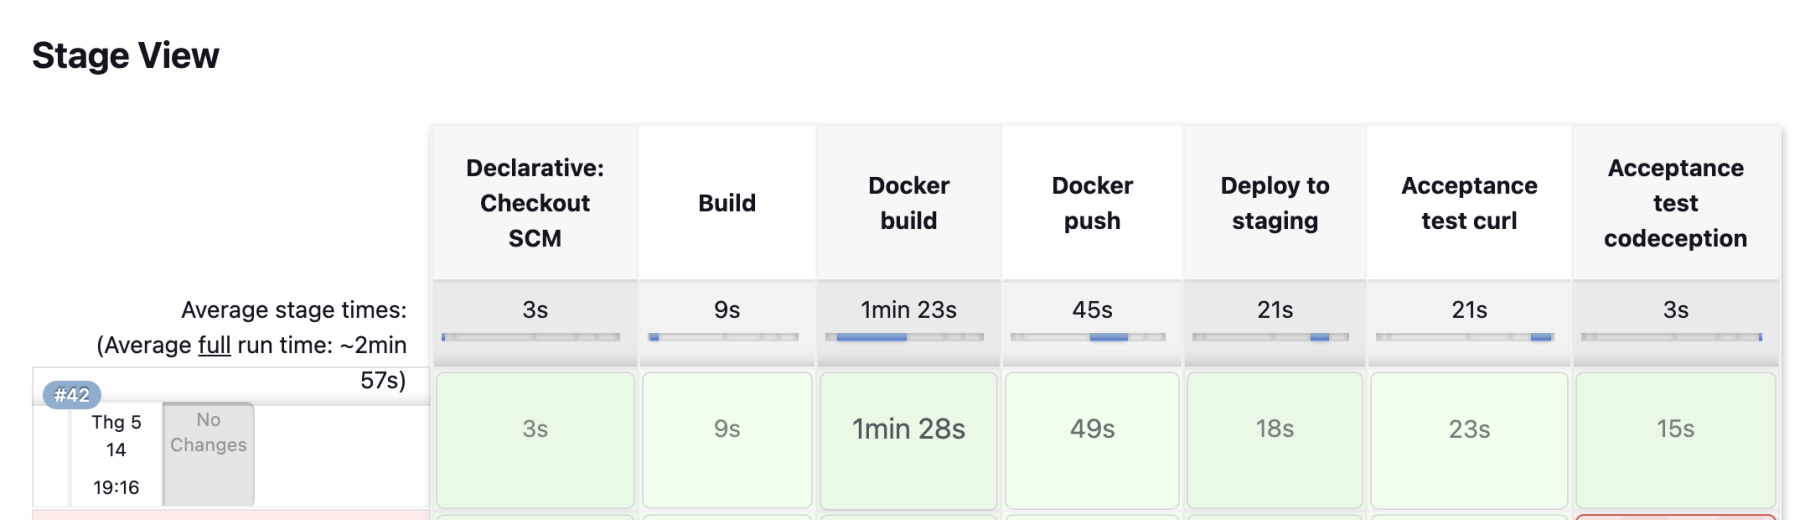
Chúng ta cần phải tạo ra 1 file có tên là Jenkinsfile ở thư mục gốc của dự án, Jenkinsfile được đặt ở thư mục gốc của dự án Laravel để hỗ trợ việc triển khai CI/CD với Jenkins. Trong Jenkinsfile, bạn có thể định nghĩa các bước cụ thể mà Jenkins sẽ thực hiện khi triển khai pipeline cho dự án Laravel của bạn. Cụ thể, Jenkinsfile chứa các đoạn mã Groovy để định nghĩa các stage, các bước xây dựng, kiểm thử, và triển khai ứng dụng Laravel của bạn.
Ví dụ trong file jenkins file chúng ta có đoạn code sau:
pipeline {
agent any
stages {
stage("Build") {
steps {
sh 'php --version'
sh 'composer install'
sh 'composer --version'
sh 'cp .env.example .env'
sh 'php artisan key:generate'
}
}
stage("Unit test") {
steps {
sh 'php artisan test'
}
}
}
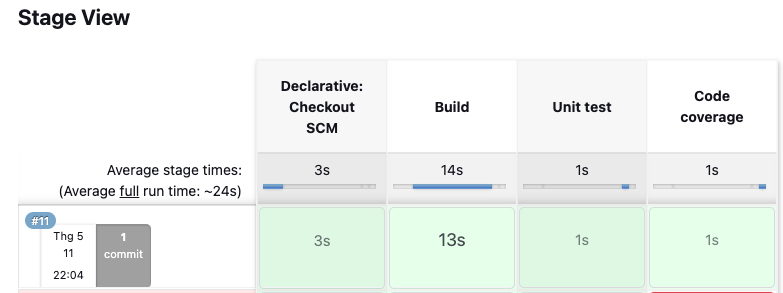
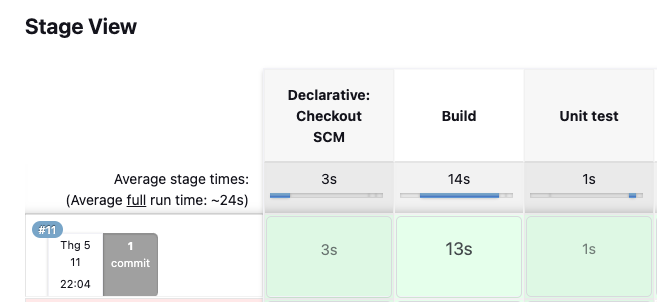
}Tiếp theo chúng ta cần phải triển khai các bước CI/CD trong dự án của chúng ta:
- Bước 1: Build và Test
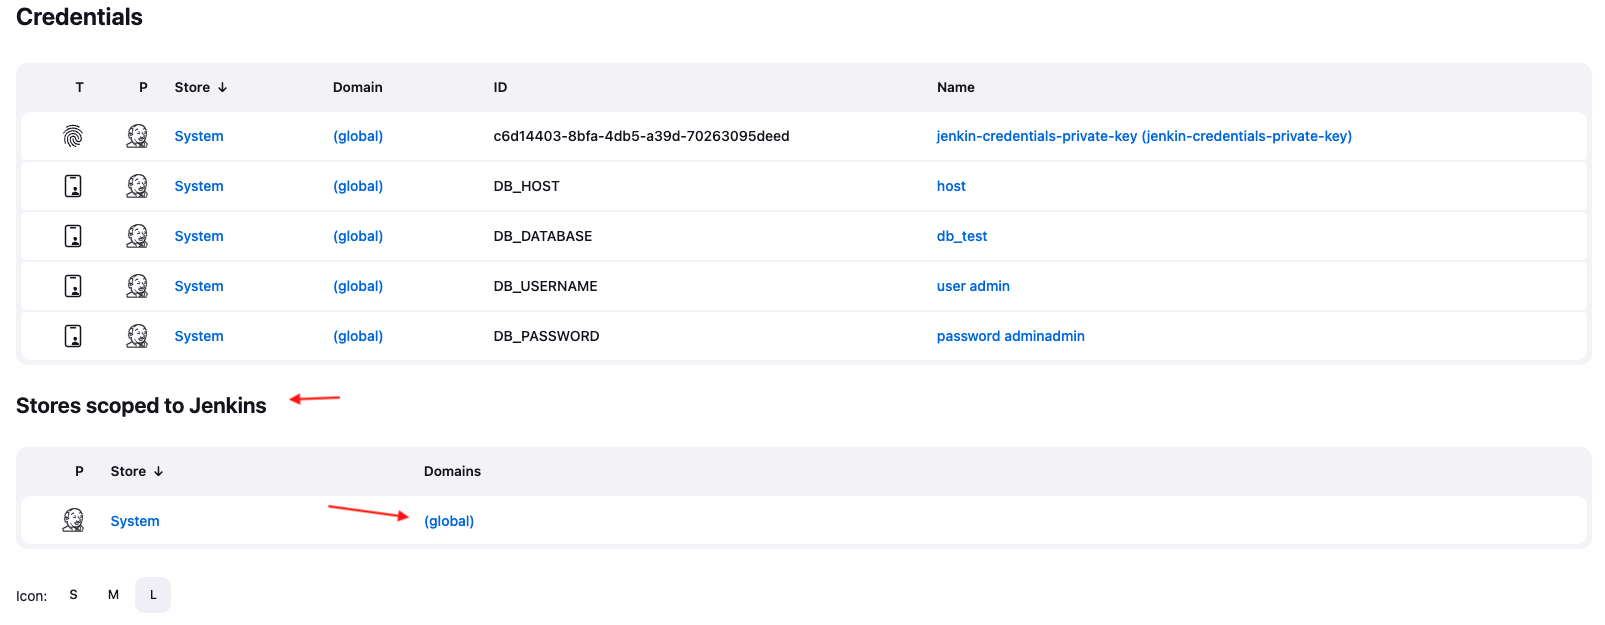
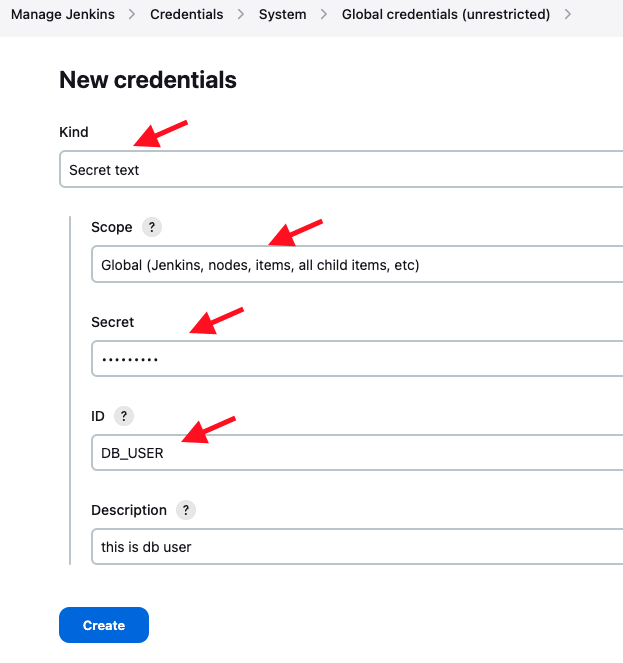
- Cách sử dụng credentials trong jenkin:
- Link
- Hoặc làm theo các bước dưới đây:
- Pipeline code:
-
pipeline {
    agent any
    stages {
        stage("Build") {
            environment {
                DB_HOST = credentials("DB_HOST")
                DB_DATABASE = credentials("DB_DATABASE")
                DB_USERNAME = credentials("DB_USERNAME")
                DB_PASSWORD = credentials("DB_PASSWORD")
            }
            steps {
                sh 'php --version'
                sh 'composer install'
                sh 'composer --version'
                sh 'cp .env.example .env'
                sh 'echo DB_HOST=${DB_HOST} >> .env'
                sh 'echo DB_USERNAME=${DB_USERNAME} >> .env'
                sh 'echo DB_DATABASE=${DB_DATABASE} >> .env'
                sh 'echo DB_PASSWORD=${DB_PASSWORD} >> .env'
                sh 'php artisan key:generate'
                sh 'cp .env .env.testing'
                sh 'php artisan migrate'
            }
        }
        stage("Unit test") {
            steps {
                sh 'php artisan test'
            }
        }
    }
}
-
- Trong ví dụ trên mình tạo ra một DB từ RDS để phục vụ cho việc chạy test ứng dụng.
- Kết quả:
- Cách sử dụng credentials trong jenkin:
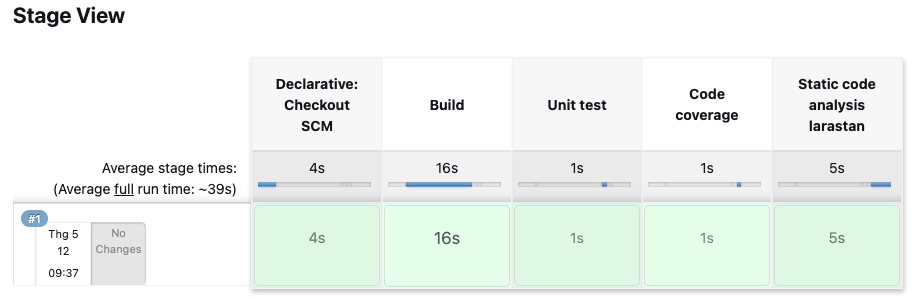
- Bước 2: Running code coverage test
- Trong server jenkin các bạn nhớ cài php-xdebug nhé! for ubuntu.
-
sudo apt-get install php8.1-xdebug
-
- Stage:
-
stage("Code coverage") {
    steps {
        sh "vendor/bin/phpunit --coverage-html 'reports/coverage'"
    }
}
-
- Kết quả:
- Và check coverage test tại:
-
http://54.169.96.199:8080/job/laravel-app/11/execution/node/3/ws/reports/coverage/index.html
-
- Trong server jenkin các bạn nhớ cài php-xdebug nhé! for ubuntu.
- Bước 3: Running Static code analysis
- Stage:
-
stage("Static code analysis larastan") { steps { sh "./vendor/bin/phpstan analyse" } } - Nếu dự án của bạn lớn hoặc phức tạp bạn có thể thêm thuộc tính --memory-limit , không không có nó sẽ lấy theo dung lượng trong php.init của bạn.
-
sh "./vendor/bin/phpstan analyse --memory-limit=1G"
-
-
- Kết quả:
- Stage:
- Bước 4: Static code analysis phpcs
- Stage:
-
stage("Static code analysis phpcs") {
    steps {
        sh "./vendor/bin/phpcs"
    }
}
-
- Kết quả:
- Stage:

Cấu Hình Ansible Cho Server Jenkin
Các bạn cần phải vào lại server jenkin và sau đó cài đặt ansible:
# Cài đặt trên Ubuntu
apt-add-repository -y ppa:ansible/ansible
apt-get update
apt-get install -y ansible
-------------------------------------------
python3 --version
sudo apt install python3-pip
pip3 install boto3
Hoặc xem trên trang doc của ansible để xem chi tiết và cài đặt: Link.
Bước tiếp theo chúng ta sẽ Config Ansible.
cd /etc/ansible/
vim ansible.cfg
Thêm cấu hình dưới đây để sử dụng plugins aws_ec2 thay vì mặc định sử dụng host:
[defaults]
inventory = ./ansible_plugins
enable_plugins = aws_ec2
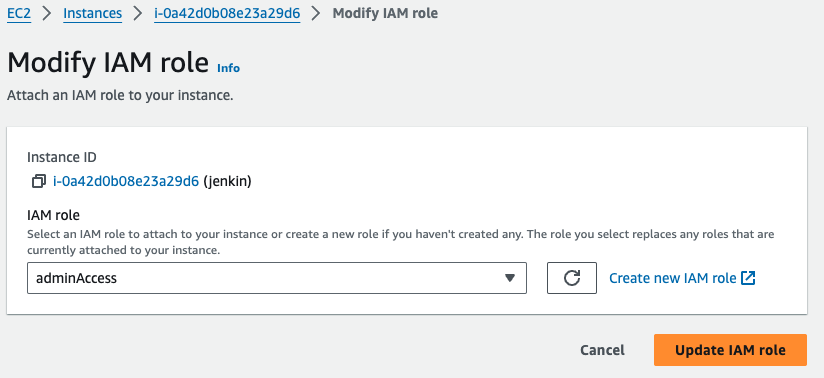
host_key_checking = FalseChúng ta cần phải tạo 1 IAM role với quyền admin hoặc 1 quyền phù hợp để gắn vào server Jenkin, để cho phép Ansible có thể lấy thông tin của các instances, thay vì sử dụng access key và private key credential IAM user.
Sau đó, chúng ta sẽ tạo một thư mục mới và tạo tệp yml đại diện cho Ansible dynamic inventory (mã code tiếp theo cho phép chúng ta thu thập thông tin từ EC2 instance một cách linh hoạt).
mkdir ansible_plugins
cd ansible_plugins
vim production_aws_ec2.yml
Sau đó thì paste đoạn config cấu hình YAML dành cho dynamic inventory plugin của Ansible cho Amazon EC2. Dưới đây là các phần chính của tập tin cấu hình:
-
Plugin và cài đặt thông số: Đầu tiên, nó xác định plugin sẽ được sử dụng là aws_ec2, cho phép Ansible tự động lấy thông tin về các EC2 instances từ AWS. Các thông số khác như aws_access_key và aws_secret_key có thể được cung cấp tại đây, nhưng chúng đã được comment lại trong tập tin này, vì Ansible có thể tự động tìm kiếm thông tin xác thực từ các nguồn khác nhau.
-
Regions và filters: Cấu hình plugin để chỉ lấy thông tin về các EC2 instances đang chạy trong một hoặc nhiều khu vực (regions) cụ thể. Filters được sử dụng để chỉ lấy các instances có trạng thái running.
-
Keyed groups: Đây là cách mà plugin tổ chức các EC2 instances thành các nhóm dựa trên các thuộc tính của chúng, như tags, kiến trúc, loại instance, vùng đặt, image ID, hypervisor, hoặc các nhóm bảo mật (security groups). Các nhóm này có thể được sử dụng sau này trong playbook của Ansible.
-
Hostnames và compose: Xác định thứ tự ưu tiên cho các biến hostname, như địa chỉ IP, tên miền DNS, tên tag của EC2 instance (nếu có), hoặc địa chỉ IP riêng. Phần compose được sử dụng để xác định các biến cụ thể mà Ansible sử dụng để kết nối với các EC2 instances
Và còn nhiều cấu hình khác các bạn có thể tham khảo thông tin ở đây: Link
# aws ec2 ansible dynamic inventory plugin
plugin: aws_ec2
#set aws_access_key and secret_key.
#aws_access_key: AWS_ACCESS_KEY
#aws_secret_key: AWS_SECRET_KEY
# set the regions.
regions:
  - ap-southeast-1
# - us-east-2
# set strict to False
# if True this will make invalid entries
# a fatal error
strict: False
filters:
  instance-state-name: running
keyed_groups:
  #  each aws ec2 instance has it own instance tags. create
  #  a tag variable from those tags for ansible to use.
  #  if the ec2 tag Name had the value cygnusx1 the tag
  #  variable would be:
  #  tag_Name_cygnusx1
  #  if a tag existed for an aws instance as
  #  Applications with the value of Oracle the
  #  variable would be:
  #  tag_Applications_Oracle
  - key: tags
    prefix: tag
  #
  # the following keyed groups are from the aws url:
  # https://docs.aws.amazon.com/cli/latest/reference/ec2/describe-instances.html#options
  # below are some of the variable that can be used.
  # an example for instance_type:
  # aws_instance_type_t2_micro
  - key: architecture
    prefix: arch
  - key: tags.Applications
    separator: ''
  - key: instance_type
    prefix: aws_instance_type
  - key: placement.region
    prefix: aws_region
  - key: image_id
    prefix: aws_image
  - key: hypervisor
    prefix: aws_hypervisor
  - key: 'security_groups|json_query("[].group_id")'
    prefix: 'security_groups'
hostnames:
# a list in order of precedence for hostname variables.
#
  - ip-address
  - dns-name
  - tag:Name
  - private-ip-address
compose:
# use if you need to connect via the ec2
# private ip address.
#
# this is needed for example in a
# corporate / company environment where ec2
# instances don't use a public ip address
#
#  ansible_host: private_ip_address
Sau đó thì chạy lệnh sau để test xem Ansible đã lấy được các thông tin Instance hay chưa:
ansible-inventory -i /etc/ansible/ansible_plugins/aws_ec2.yml --listNếu các bạn thấy thông tin instance đã được hiển thị theo điều kiện lọc trong file production_aws_ec2.yml thì các bạn đã kết nối thành công.
Để Jenkin có thể kết nối (SSH) vào server Staging hay Production chúng ta cần phải tạo ra một file key.pem để lưu private key của các Insances này.
cd /etc/ansible
mkdir pem
nano pem/key.pem
chown jenkins:root pem/key.pem
Sau đó chúng ta sang server production hoặc staging để lấy private key và lưu vào file key.pem này (có thể lấy file .pem lúc ban đầu khi chúng ta tạo instance) hoặc tạo ra 1 user có đủ permisson để có thể cài đặt những packages sau đó hãy copy private key của user đó vào đây.
-----BEGIN RSA PRIVATE KEY-----
MIIE…
-----END RSA PRIVATE KEY-----
Sau đó thì chạy test xem nó đã SSH vào được server chưa bằng lệnh sau:
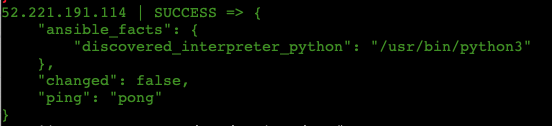
ansible aws_ec2 -i /etc/ansible/ansible_plugins/aws_ec2.yml -m ping --private-key=/etc/ansible/pem/key.pem -u ubuntuCác bạn nhìn thấy kết quả như này là Ok
Hoặc chúng ta có thể test là đứng từ server jenkin sử dụng Ansible để install git cho server production như sau:
ansible aws_ec2 -i /etc/ansible/ansible_plugins/aws_ec2.yml -m apt -a 'name=git state=present' --private-key=/etc/ansible/pem/key.pem -u ubuntu --become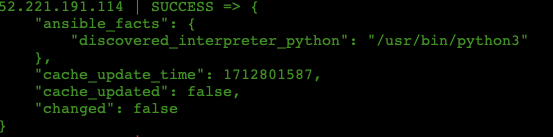 Sang server staging hoặc production ta sẽ thấy GIT đã được install.Ok vậy là đã thiết lập xong Ansible
Cấu Hình Ansible Playbooks
Bước 1 : Tạo playbook-staging-run.yml
cd /etc/ansible/
mkdir playbook
nano /etc/ansible/playbook/playbook-staging-run.yml
Kiểm tra xem nó chạy container dinhhongson/laravel-app mới trong cổng 80 - chỉ trên instance có tag type: “staging”):
- hosts: tag_Name_staging
become: yes
remote_user: ubuntu
name: Upgrade all packages and set up project
tasks:
- debug:
var: ansible_play_batch
- name: Update all packages
apt:
update_cache: yes
upgrade: dist
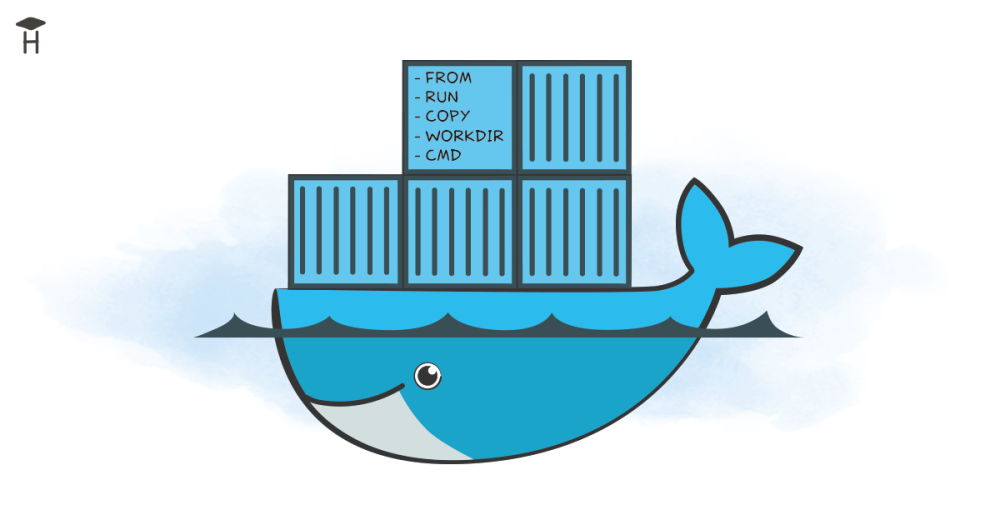
- name: Install Docker dependencies
apt:
name:
- apt-transport-https
- ca-certificates
- curl
- gnupg-agent
- software-properties-common
state: present
- name: Add Docker GPG key
apt_key:
url: https://download.docker.com/linux/ubuntu/gpg
state: present
- name: Add Docker repository
apt_repository:
repo: deb [arch=amd64] https://download.docker.com/linux/ubuntu focal stable
state: present
- name: Update apt cache
apt:
update_cache: yes
- name: Install Docker
apt:
name: docker-ce
state: present
- name: Start Docker service
systemd:
name: docker
state: started
enabled: yes
- name: Add admin user
user:
name: ubuntu
groups: docker
append: yes
- name: Install Python pip
apt:
name: python3-pip
state: present
- name: Install docker-py
pip:
name: docker-py
- name: Run laravel container
docker_container:
name: laravel-app
image: dinhhongson/laravel-app:v1
state: started
exposed_ports: "80"
published_ports: "80:80"Sau bước này bạn có thể test xem playbook đã chạy hay chưa bằng lệnh sau:
ssh-agent sh -c 'ssh-add /etc/ansible/pem/key.pem && ansible-playbook /etc/ansible/playbook/test-playbook-staging.yml'Nếu các packages của chúng ta đã được cài bên các server khác thì là config thành công.
Bước 2: playbook-staging-acceptionce-curl.yml
nano /etc/ansible/playbook/playbook-staging-acceptance-curl.ymlPlaybook này cho phép thực hiện kiểm tra acceptance trên container đang chạy trong môi trường staging xem đã được cài cắm và chạy ổn định chưa. Các bạn tạo ra một endpoit vd: acceptance/test/sum/4/2 (trong đó 4 và 2 là tham số truyền vào, nếu cộng tổng bằng 6 được trả về thì là việc build một docker container bên server staging đã thành công).
- hosts: tag_Name_staging
  become: yes
  remote_user: ubuntu
  tasks:
    - name: Make HTTP request
      shell: "curl -s -w '%{http_code}' http://localhost/acceptance/test/sum/4/2"
      register: response
    - debug:
        msg: "HTTP Response: {{ response.stdout }}"
    - name: Check result curl
      fail:
        msg: "Kết quả curl không phải là 6"
      when: response.stdout != '6'
class HomeController extends Controller
{
/**
* Return sumatory
*
* @return int
*/
public function sum(int $num1, int $num2)
{
return $num1+$num2;
}
}
Bước 3 : playbook-staging-acceptance.yml
Playbook này cho phép thực hiện kiểm tra acceptance trên container đang chạy trong môi trường staging.
nano /etc/ansible/playbook/playbook-staging-acceptance.ymlSau đó thì put đoạn code test sau vào để test xem đã chạy đúng luồng hay tính năng chưa:
- hosts: tag_Name_staging
  become: yes
  remote_user: ubuntu
  tasks:
    - name: Run acceptance tests
      command: docker exec -it laravel-app bash -c './vendor/bin/codecept run';
      register: atesting
    - debug: msg="{{ atesting.stdout }}"
Bước 4: playbook-staging-stop.yml
Playbook này cho phép dừng container và xóa image docker.
nano /etc/ansible/playbook/playbook-staging-stop.ymlSau đó put đoạn config sau:
- hosts: tag_Name_staging
  become: yes
  remote_user: ubuntu
  tasks:
    - name: Delete laravel containers
      docker_container:
        name: laravel-app
        force_kill: true
        keep_volumes: false
        state: absent
     - name: Remove image
      docker_image:
        state: absent
        name: dinhhongson/laravel-app
Bước 5: Cấu hình playbook-production-run.yml cho production
Playbook này cho phép cài đặt phần mềm cần thiết bên trong môi trường production, chạy version mới của dự án laravel (chạy một container mới).
nano /etc/ansible/playbook/playbook-production-run.ymlkiểm tra xem nó chạy container dinhhongson/laravel-app mới trong cổng 80 - chỉ trên instance có tag type: “ production”):
- hosts: tag_Name_production
  become: yes
  remote_user: ubuntu
  name: Upgrade all packages and set up project
  tasks:
    - debug:
        var: ansible_play_batch

    - name: Update all packages
      apt:
        update_cache: yes
        upgrade: dist

    - name: Install Docker dependencies
      apt:
        name:
          - apt-transport-https
          - ca-certificates
          - curl
          - gnupg-agent
          - software-properties-common
        state: present

    - name: Add Docker GPG key
      apt_key:
        url: https://download.docker.com/linux/ubuntu/gpg
        state: present

    - name: Add Docker repository
      apt_repository:
        repo: deb [arch=amd64] https://download.docker.com/linux/ubuntu focal stable
        state: present

    - name: Update apt cache
      apt:
        update_cache: yes

    - name: Install Docker
      apt:
        name: docker-ce
        state: present

    - name: Start Docker service
      systemd:
        name: docker
        state: started
        enabled: yes

    - name: Add admin user
      user:
        name: ubuntu
        groups: docker
        append: yes

    - name: Install Python pip
      apt:
        name: python3-pip
        state: present

    - name: Install docker-py
      pip:
        name: docker-py

    - name: Run laravel container
      docker_container:
        name: laravel-app
        image: dinhhongson/laravel-app:v1
        state: started
        exposed_ports: "80"
        published_ports: "80:80"
Bước 5: Cấu hình playbook-production-acceptance.yml
Playbook này cho phép thực hiện các thử nghiệm trên container đang chạy trong môi trường production.
- hosts: tag_type_production
  become: yes
  remote_user: ec2-user
  tasks:
    - name: Run smoke tests
      command: docker exec -it laravel-app bash -c './vendor/bin/codecept run';
      register: stesting
    - debug: msg="{{ stesting.stdout }}"
Test


Bình luận (0)