- Chuyên mục khác :
- PHP và Laravel
- ·
- Database - Git - Linux
- ·
- Vuejs
- ·
- Lập Trình Web
- Getting Started
- Vue.js là gì?
- Các cách sử dụng Vue khác nhau
- Khám phá các lựa chọn thay thế Vue
- Xây dựng ứng dụng đầu tiên chỉ bằng JavaScript
- Xây dựng lại ứng dụng với Vue
- Basics & Core Concepts - DOM Interaction with Vue
- Module Introduction
- Connecting Vue App Instances
- Interpolation và Data Binding
- Binding Attributes với v-bind Directive
- Understanding methods in Vue Apps
- Working with Data inside of a Vue App
- Outputting Raw HTML Content with v-html
- Event Binding v-on
- Events & Methods
- Using the Native Event Object
- Event Modifiers
- Two-Way Binding
- Methods used for Data Binding
- Computed Properties
- Working with Watchers
- Methods vs Computed Properties vs Watchers
- v-bind and v-on Shorthands
- Dynamic Styling with Inline Styles
- CSS Classes Dynamically
- Rendering Conditional Content & Lists
- Conditions & Lists Starting-Setup
- v-if, v-else and v-else-if
- v-show
- Rendering Lists of Data
- Vue Behind The Scenes
- Understand Vue Reactivity
- Understanding Templates
- Working with Refs
- How Vue Updates the DOM
- Vue App Lifecycle
- Components
- Workflow with Vue3 CLI
- Vue Initial Steps & Structure
- Inspecting the Vue Project
- Vue extentions
- Vue Component
- Props
- $emit and Listening to Events
- Method of array object in JavaScript
- Provide + Inject
- Global vs Local Components
- Scoped Styles
- Slots
- Dynamic Components and Keeping Dynamic Components Alive
- Teleporting Elements
- Fragments
- The Vue Style Guide
Lý do tại sao mình viết ra sample này chỉ bằng Javascript mà không phải là Vuejs luôn, chỉ đơn thuần muốn cho chúng ta thấy rằng sau khi áp dụng Vuejs nó khác biệt với Javascript thuần nó như thế nào.
Mình đã chuẩn bị code sample cho các bạn bao gồm index.html, styles.css, app.js các bạn hãy cùng xem và cùng mình chạy nhé để xem cách viết của Javascript nó như thế nào, nó sẽ có điểm giống và khác nhau như thế nào với Vuejs.
index.html
<!DOCTYPE html>
<html lang="en">
  <head>
    <meta charset="UTF-8" />
    <meta name="viewport" content="width=device-width, initial-scale=1.0" />
    <title>A First App</title>
    <link rel="stylesheet" href="styles.css" />
  </head>
  <body>
    <div id="app">
      <div>
        <label for="goal">Goal</label>
        <input type="text" id="goal" />
        <button>Add Goal</button>
      </div>
      <ul>
        <li>Test</li>
      </ul>
    </div>
    <script src="app.js"></script>
  </body>
</html>
styles.css
* {
  box-sizing: border-box;
}

html {
  font-family: sans-serif;
}

body {
  margin: 0;
}

#app {
  margin: 3rem auto;
  max-width: 40rem;
  padding: 1rem;
  box-shadow: 0 2px 8px rgba(0, 0, 0, 0.26);
}

label, input {
  margin-bottom: 0.5rem;
  display: block;
  width: 100%;
}

label {
  font-weight: bold;
}

ul {
  list-style: none;
  margin: 1rem 0;
  padding: 0;
}

li {
  margin: 1rem 0;
  padding: 1rem;
  border: 1px solid #ccc;
}
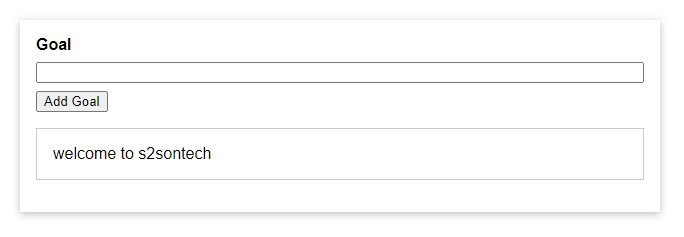
Sau khi chạy lên các bạn sẽ được kết quả như hình trên, nhiệm vụ của chúng ta là sẽ viết một đoạn script bằng Javascript để KHI click vào button "Add Goal" ngay lập tức lấy được giá trị trong input và hiển thị bên dưới. OK hãy cùng nhau bắt đầu thôi!
app.js
const buttonEl = document.querySelector('button');
const inputEl = document.querySelector('input');
const listEl = document.querySelector('ul');

function addGoal() {
    const enteredValue = inputEl.value;
    const listItemEl = document.createElement('li');
    listItemEl.textContent = enteredValue;
    listEl.appendChild(listItemEl);
    inputEl.value = '';
}

buttonEl.addEventListener('click', addGoal);
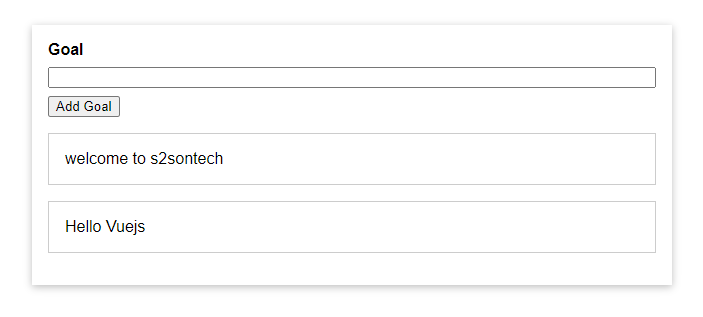
Ok vậy là chúng ta đã hoàn thành demo và có kết quả như sau:

Đó chỉ là JavaScript, không có Vue hoạt động, và rõ ràng đó là một trang web demo rất đơn giản. Tuy nhiên, bây giờ chúng ta sẽ sử dụng Vue và sau đó bạn sẽ thấy lý do tại sao Vue có thể khá thú vị, vì sao nó làm cho việc xây dựng trang web trở nên thú vị hơn.
Sau đó, mình cũng sẽ nói về sự khác biệt giữa Vue và cách tiếp cận này, nhưng trước hết, hãy chuyển sang Vue trong bài tiếp theo.


Bình luận (0)